Developer Guide

Table of Contents
- Table of Contents
- 1. Acknowledgements
- 2. Setting up, getting started
- 3. Design
- 4. Implementation
- 5. Documentation, logging, testing, configuration, dev-ops
- Appendix A: Requirements
-
Appendix B: Instructions for manual testing
- B.1 Launch and shutdown
- B.2 List all students
- B.3 Help
- B.4 Feedback
- B.5 Adding a student
- B.6 Editing a student
- B.7 Deleting a student
- B.8 Finding a student
- B.9 Finding a course
- B.10 Sort by name
- B.11 Sort by course size
- B.12 Sort by tags
- B.13 Clearing courses
- B.14 Changing themes
- B.15 Clearing all students
- B.16 Issues with saving data
-
Appendix C: Planned Enhancements
- C.1 Allow Duplicate Student Names
- C.2 Do not allow duplicate Telehandles
- C.3 Improve Error Messaging for ‘theme’ Command
- C.4 Improve error message for commands which take in an INDEX
- C.5 Incorporate courses from Special Terms 1 and 2 into NUSCourseMates
- C.6 Customising the sort functions
- C.7 Updating Telehandle’s requirement
- C.8 Improving error messages
- C.9 Finding tags
- Appendix D: Effort
1. Acknowledgements
- The foundational code was derived from Addressbook-level3
- We also reused code from StackOverflow for case-insensitive sorting.
2. Setting up, getting started
Refer to the guide Setting up and getting started.
3. Design
.puml files used to create diagrams in this document docs/diagrams folder. Refer to the PlantUML Tutorial at se-edu/guides to learn how to create and edit diagrams.
3.1 Architecture

The Architecture Diagram given above explains the high-level design of the App.
Given below is a quick overview of main components and how they interact with each other.
Main components of the architecture
Main (consisting of classes Main and MainApp) is in charge of the app launch and shut down.
- At app launch, it initializes the other components in the correct sequence, and connects them up with each other.
- At shut down, it shuts down the other components and invokes cleanup methods where necessary.
The bulk of the app’s work is done by the following four components:
-
UI: The UI of the App. -
Logic: The command executor. -
Model: Holds the data of the App in memory. -
Storage: Reads data from, and writes data to, the hard disk.
Commons represents a collection of classes used by multiple other components.
How the architecture components interact with each other
The Sequence Diagram below shows how the components interact with each other for the scenario where the user issues the command delete 1.

Each of the four main components (also shown in the diagram above),
- defines its API in an
interfacewith the same name as the Component. - implements its functionality using a concrete
{Component Name}Managerclass (which follows the corresponding APIinterfacementioned in the previous point.
For example, the Logic component defines its API in the Logic.java interface and implements its functionality using the LogicManager.java class which follows the Logic interface. Other components interact with a given component through its interface rather than the concrete class (reason: to prevent outside component’s being coupled to the implementation of a component), as illustrated in the (partial) class diagram below.

The sections below give more details of each component.
3.2 UI component
The API of this component is specified in Ui.java

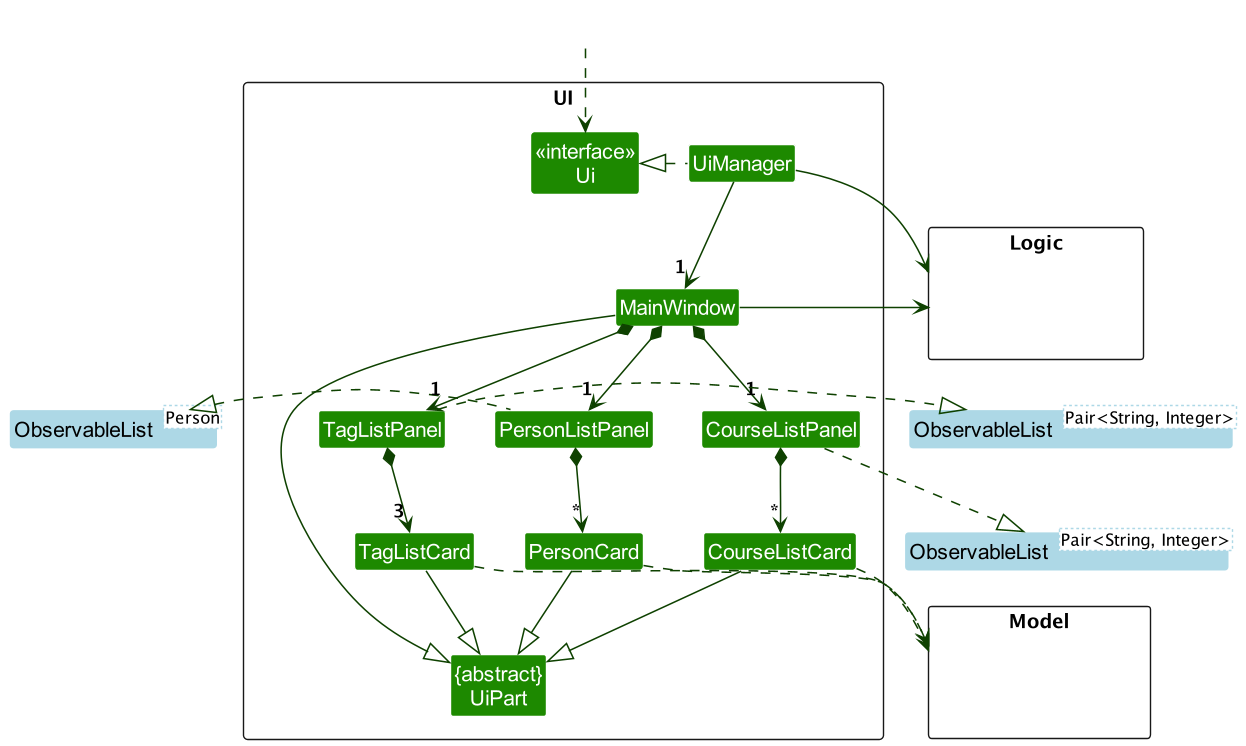
The UI consists of a MainWindow that is made up of parts e.g.CommandBox, ResultDisplay, PersonListPanel, StatusBarFooter etc. All these, including the MainWindow, inherit from the abstract UiPart class which captures the commonalities between classes that represent parts of the visible GUI.
The UI component uses the JavaFx UI framework. The layout of these UI parts are defined in matching .fxml files that are in the src/main/resources/view folder. For example, the layout of the MainWindow is specified in MainWindow.fxml
The UI component,
- executes user commands using the
Logiccomponent. - listens for changes to
Modeldata so that the UI can be updated with the modified data. - keeps a reference to the
Logiccomponent, because theUIrelies on theLogicto execute commands. - depends on some classes in the
Modelcomponent, as it displaysPersonobject residing in theModel.
3.2.1 List Panel
In the UI of the MainWindow, three major List Panels—PersonListPanel, CourseListPanel, and TagListPanel—implement the Observer Design Pattern using the ObservableList class.
Each panel observes changes in its associated data, enabling dynamic updates in response to modifications.
For instance, the CourseListPanel, observing the ObservableList<Pair<String, Integer>>, triggers updates to the CourseListCard upon any changes in the courses.
This implementation is replicated for PersonListPanel and TagListPanel.
The following class diagram illustrates the relationships:
3.3 Logic component
API : Logic.java
Here’s a (partial) class diagram of the Logic component:

The sequence diagram below illustrates the interactions within the Logic component, taking execute("delete 1") API call as an example.

![]() Note:
Note:
- The lifeline for
DeleteCommandParsershould end at the destroy marker (X) but due to a limitation of PlantUML, the lifeline reaches the end of diagram.
How the Logic component works:
- When
Logicis called upon to execute a command, it is passed to anAddressBookParserobject which in turn creates a parser that matches the command (e.g.,DeleteCommandParser) and uses it to parse the command. - This results in a
Commandobject (more precisely, an object of one of its subclasses e.g.,DeleteCommand) which is executed by theLogicManager. - The command can communicate with the
Modelwhen it is executed (e.g. to delete a person). - The result of the command execution is encapsulated as a
CommandResultobject which is returned back fromLogic.
Here are the other classes in Logic (omitted from the class diagram above) that are used for parsing a user command:

How the parsing works:
- When called upon to parse a user command, the
AddressBookParserclass creates anXYZCommandParser(XYZis a placeholder for the specific command name e.g.,AddCommandParser) which uses the other classes shown above to parse the user command and create aXYZCommandobject (e.g.,AddCommand) which theAddressBookParserreturns back as aCommandobject. - All
XYZCommandParserclasses (e.g.,AddCommandParser,DeleteCommandParser, …) inherit from theParserinterface so that they can be treated similarly where possible e.g, during testing.
3.4 Model component
API : Model.java

The Model component,
- stores NUSCoursemates data i.e., all
Personobjects (which are contained in aUniquePersonListobject). - stores the currently ‘selected’
Personobjects (e.g., results of a search query) as a separate filtered list which is exposed to outsiders as an unmodifiableObservableList<Person>that can be ‘observed’ e.g. the UI can be bound to this list so that the UI automatically updates when the data in the list change. - stores a
UserPrefobject that represents the user’s preferences. This is exposed to the outside as aReadOnlyUserPrefobjects. - does not depend on any of the other three components (as the
Modelrepresents data entities of the domain, they should make sense on their own without depending on other components)
![]() Note:
Note:
- An alternative (arguably, a more OOP) model is given below. It has a
Taglist in theAddressBook, whichPersonreferences. This allowsAddressBookto only require oneTagobject per unique tag, instead of eachPersonneeding their ownTagobjects.

3.5 Storage component
API : Storage.java

The Storage component,
- can save both NUSCoursemates data and user preference data in JSON format, and read them back into corresponding objects.
- inherits from both
AddressBookStorageandUserPrefStorage, which means it can be treated as either one (if only the functionality of only one is needed). - depends on some classes in the
Modelcomponent (because theStoragecomponent’s job is to save/retrieve objects that belong to theModel)
3.6 Common classes
Classes used by multiple components are in the seedu.addressbook.commons package.
4. Implementation
This section describes some noteworthy details on how certain features are implemented.
4.1 Add Course feature
4.1.1 Implementation
The add course mechanism is facilitated by AddCommand. It extends Command and implements the following operation:
-
AddCommand#execute():Adds a person into NUSCoursemates
Given below is an example usage scenario and how the add mechanism behaves at each step focusing on the Course field.
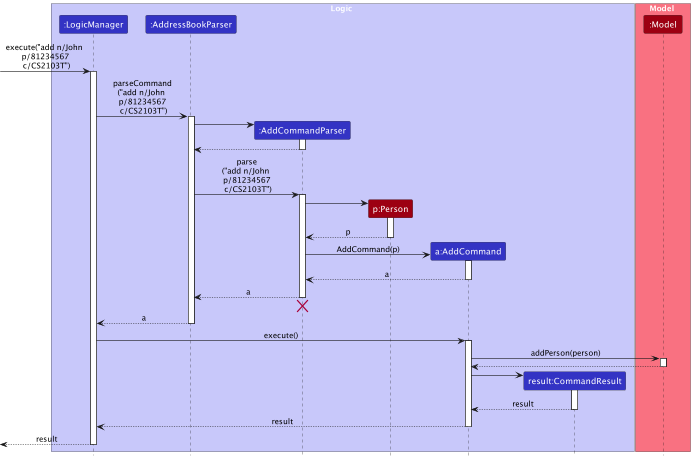
Step 1. The user executes add n/John p/81234567 c/CS2103T to add a new person.
Step 2. When LogicManager is called upon to execute the command, it will pass it to an AddressBookParser object which will call parseCommand() which creates a parser AddCommandParser object.
Step 3. The parser AddCommandParser will then parse the command and create objects for each field. The course will be indicated by the c/ prefix.
Step 4. Using all the parsed fields (Name, Phone, Email, Address, Telehandle, Tag, Courses), a Person object is constructed.
Step 5. This results in a AddCommand object which is executed by the LogicManager.
Step 6. The command will communicate with the Model to add a person.
Step 7. Upon success, the result of the command execution is encapsulated as a CommandResult object which is returned back from LogicManager.
The following sequence diagram shows how the add operation works:
![]() Note:
Note:
- The lifeline for
AddCommandParsershould end at the destroy marker (X) but due to a limitation of PlantUML, the lifeline reaches the end of diagram. - During the
AddCommandParser,Name, Phone, Email, Address, Telehandle, Tag, Courseobjects are created as well but due to space constraint and simplification, the details have been omitted - There are other classes in
Logic(omitted from the class diagram above) that are used for parsing a user command and can be found here
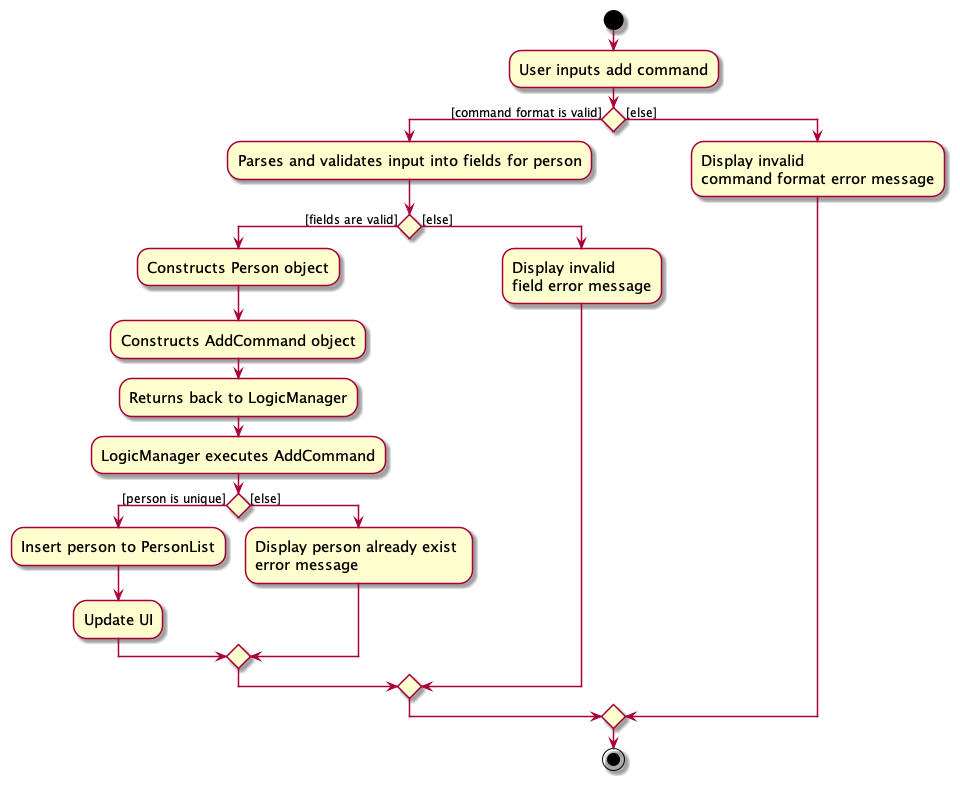
The following activity diagram shows how the add operation works:
4.1.2 Design considerations:
Aspect: Adding Courses to PersonList
-
Alternative 1: Create a new command specifically for adding courses to person records (e.g., “AddCourseCommand”).
- Pros: Offers a clear separation of concerns and commands, potentially reducing complexity.
- Cons: Introduces an additional command class, which might require extra development time.
-
Alternative 2 (current choice): Reuse the existing “AddCommand” by adding a ‘c/’ prefix to specify course addition.
- Pros: Minimises the need for creating new command classes, thus reducing code duplication.
- Cons: Slightly alters the behavior of the existing “AddCommand,” which may increase complexity and potentially confuse users.
4.2 Edit feature
4.2.1 Implementation
The edit person mechanism is facilitated by EditCommand and EditCommandParser.
Given below is an example usage scenario and how the edit behaves at each step.
Step 1. An existing user launches the application and the second person listed in NUSCoursemates is John, and one of the courses he has is MA2001.
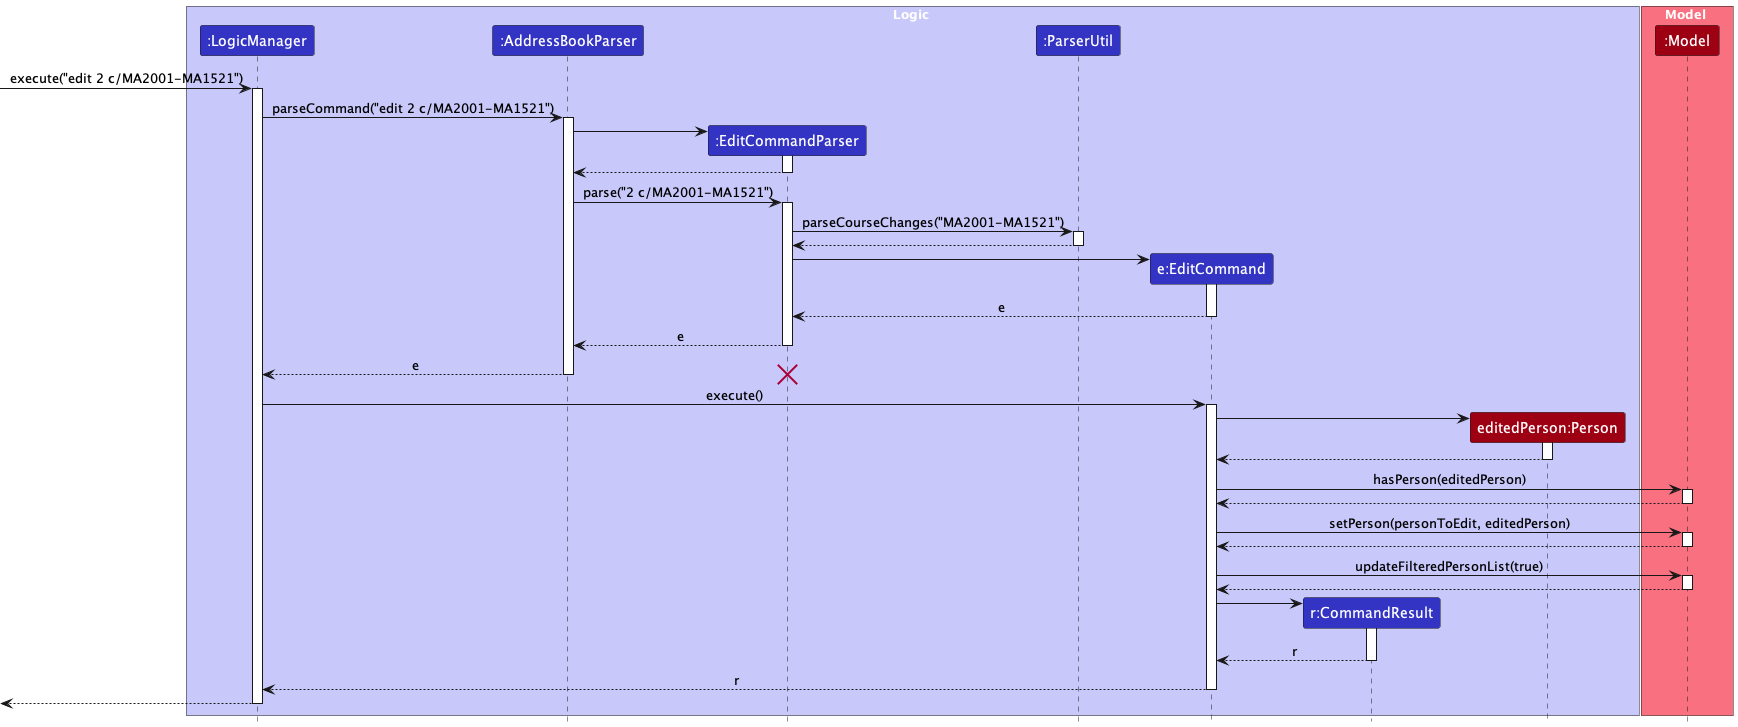
Step 2. The user executes edit 2 c/MA2001-MA1521 command to edit the second person’s MA2001 course to MA1521 in NUSCoursemates. The edit command calls LogicManager#execute(). An EditCommandParser object is then created, and EditCommandParser#parse method is called on the object. EditCommandParser#parse makes sense of the arguments supplied by the user, where the types of arguments are distinguished by their prefixes.
Step 3. ParserUtil#parseCourseChanges(courseChanges) is called, which parses the list of course changes supplied
for the second person. This method checks that the course changes are supplied in the correct format, and if so,
it checks that all the supplied courses within those course changes are valid.
Step 4. The EditCommand is created, and then executed by EditCommand#execute.
Step 5. EditCommand#execute calls the following methods from Model:
-
Model#hasPerson(editedPerson)which checks if the address book contains a duplicate person (a person with the same name). -
Model#setPerson(personToEdit, editedPerson)replacespersonToEditwitheditPerson -
Model#updateFilteredPersonList(predicate)updates the address book list with the edited person.
Step 6. EditCommand#execute returns a CommandResult to LogicManager.
The following sequence diagram shows how the edit operation works:
![]() Note:
Note:
- The lifeline for EditCommandParser should end at the destroy marker (X) but due to a limitation of PlantUML, the lifeline reaches the end of diagram.
The following activity diagram sheds more light on how exactly the chain of edit operations work:

Here are some more notes for the activity diagram above:
- When parsing the list of course modifications, if any of the specified course are invalid (see earlier definition of what is considered a ‘valid’ course), then the end node is taken immediately.
- If the end node is taken before all courses in the list that the user passed, then no course modifications present earlier in the list will be performed at all, even if they are valid.
4.2.2 Design considerations:
Aspect: Performing course edits
-
Alternative 1 (current choice): Retain the current c/ prefix in the edit command, but create additional sub-prefixes (i.e. c/add-, c/del-) after the c/ prefix.
- Pros: A common edit interface which enables all types of course modifications to be executed all at once makes this a flexible and user-friendly solution.
- Cons: We must ensure that the implementation of each type of modification is correct, and ensure the changes are performed in the correct (listed) order.
-
Alternative 2: Create a command for each type of modification, i.e. “addcourse” or “deletecourse”.
- Cons: Greatly reduced flexibility. Does not allow different types of modifications to be executed together at once, as each command can only handle one specific type of modification. There is also a lot more overhead, as three entirely new commands will have to be created, which leads to an arguably more bloated codebase.
4.3 Find Course feature
4.3.1 Implementation
The findcourse feature is facilitated by the FindCourseCommand class, which leverages a CourseContainsKeywordsPredicate object. This predicate object is responsible for checking if a person’s course contains the specified keyword. The following operations are central to this feature:
-
FindCourseCommand#execute(Model model)— Executes the command, updating the filtered person list in the model based on the criteria in the predicate. -
CourseContainsKeywordsPredicate#test(Person person)— Checks if the person’s course matches the keyword criteria.
Given below is an example usage scenario and how the findcourse mechanism behaves at each step.
Step 1. The user wants to filter the list of persons to show only those enrolled in the course “MA2001”. They execute the command “findcourse MA2001”.
Step 2. The LogicManager receives this command string and passes it to the AddressBookParser.
Step 3. The AddressBookParser identifies the type of command and invokes the FindCourseCommandParser to parse the course keyword.
Step 4. The FindCourseCommandParser creates a CourseContainsKeywordsPredicate object with the keyword “MA2001” and then creates a FindCourseCommand object with this predicate.
Step 5. The FindCourseCommand is executed, and it uses the predicate to filter the list of persons in the model. The filtered list in the model is updated to only show persons enrolled in “MA2001”.
Step 6. The result, which is the number of persons listed, is then shown to the user.
The following sequence diagram shows how the findcourse operation works:
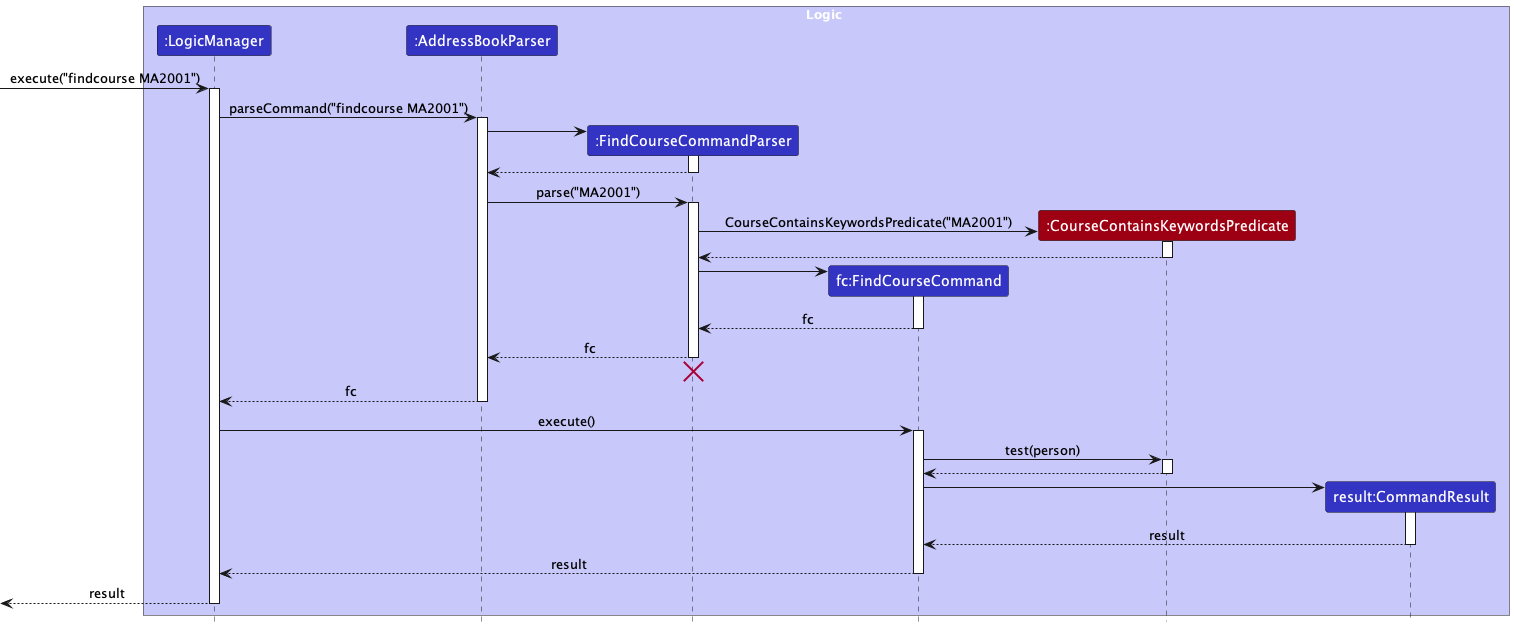
![]() Note:
Note:
- The lifeline for FindCourseCommandParser should end at the destroy marker (X) but due to a limitation of PlantUML, the lifeline reaches the end of diagram.
The following activity diagram summarizes what happens when a user executes a new findcourse command:
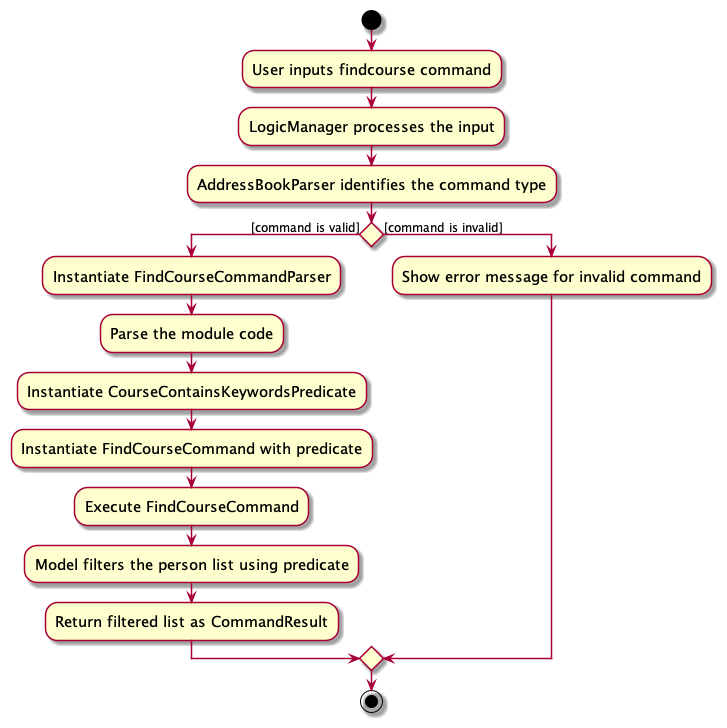
4.3.2 Design considerations:
Aspect: How filter is done:
-
Alternative 1 (current choice): Use a predicate object (
CourseContainsKeywordsPredicate) to handle filtering.- Pros: Modular approach. Easy to extend with more search features in the future. Decouples filtering logic from the command itself.
- Cons: Might be over-engineered if no other search features are planned.
-
Alternative 2: Implement filtering logic directly within the
FindCourseCommand.- Pros: Simpler without the need for additional objects or classes.
- Cons: Makes the command class more complex. Harder to extend with more search features in the future.
Aspect: Case-sensitivity in search:
-
Alternative 1 (current choice): Case-insensitive search.
- Pros: Offers flexibility and a better user experience. Users do not need to worry about the exact casing of course module IDs.
- Cons: Might yield results that the user was not expecting if there are course module IDs with varied casing.
-
Alternative 2: Case-sensitive search.
- Pros: Precise search results based on exact casing.
- Cons: Less flexible. Users need to input the exact casing of course module IDs.
4.4 Find Student feature
4.4.1 Implementation
The findstudent feature is facilitated by the FindCommand class, which uses a NameContainsKeywordsPredicate object. This predicate object is designed to check if a person’s name matches any of the specified keywords.
The following operations are central to this feature:
-
FindCommand#execute(Model model)— Executes the command, updating the filtered person list in the model based on the criteria set by the predicate. -
NameContainsKeywordsPredicate#test(Person person)— Determines if the person’s name matches any of the keyword criteria.
Outlined below is an example usage scenario and how the findstudent mechanism functions at each stage.
Step 1. The user aims to filter the list of persons to display only those whose names include “Alice” or “Bob”. They input the command “findstudent alice bob”.
Step 2. The LogicManager obtains this command string and forwards it to the AddressBookParser.
Step 3. The AddressBookParser discerns the type of command and engages the FindCommandParser to parse the name keywords.
Step 4. The FindCommandParser constructs a NameContainsKeywordsPredicate object with the keywords “Alice” and “Bob” and subsequently initiates a FindCommand object using this predicate.
Step 5. The FindCommand is then executed. Utilizing the predicate, it filters the list of persons in the model. The model’s filtered list is updated to only show persons with names “Alice” or “Bob”.
Step 6. The outcome, which indicates the number of persons found, is presented to the user.
The following sequence diagram shows how the findstudent operation works:
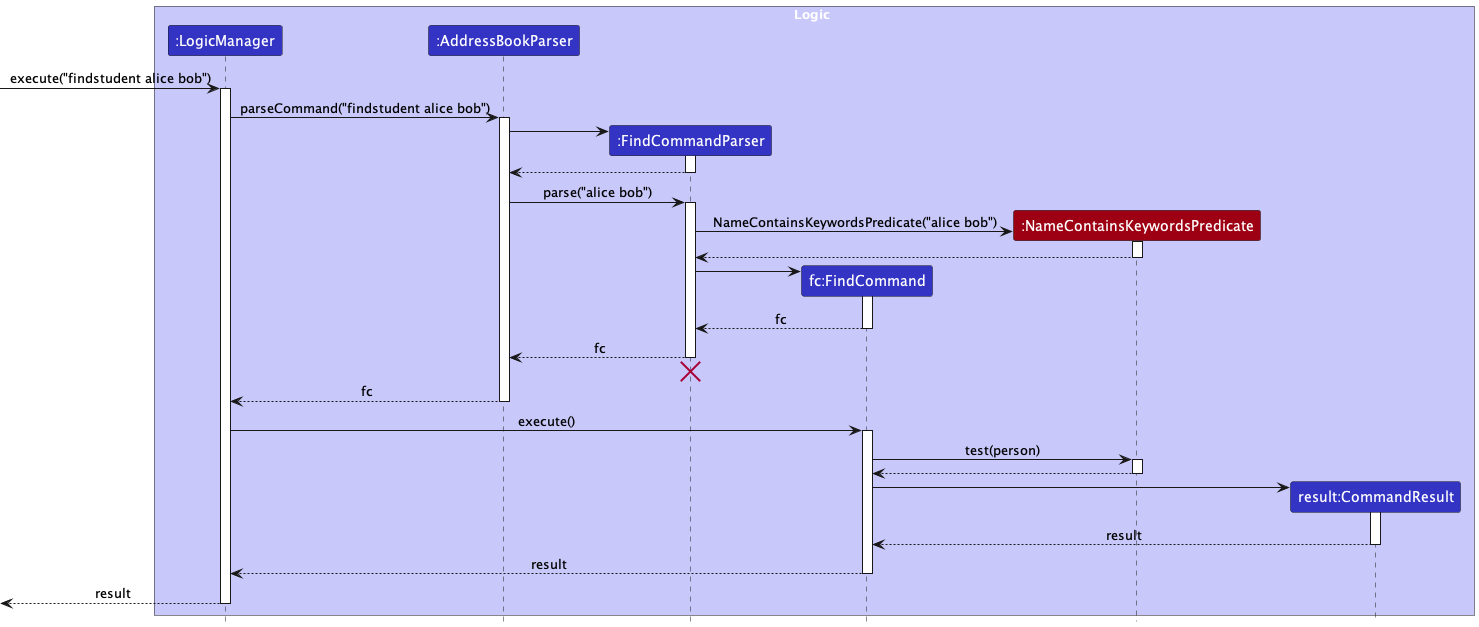
![]() Note:
Note:
- The lifeline for FindCommandParser should end at the destroy marker (X) but due to a limitation of PlantUML, the lifeline reaches the end of diagram.
The following activity diagram summarizes what happens when a user executes a new findstudent command:
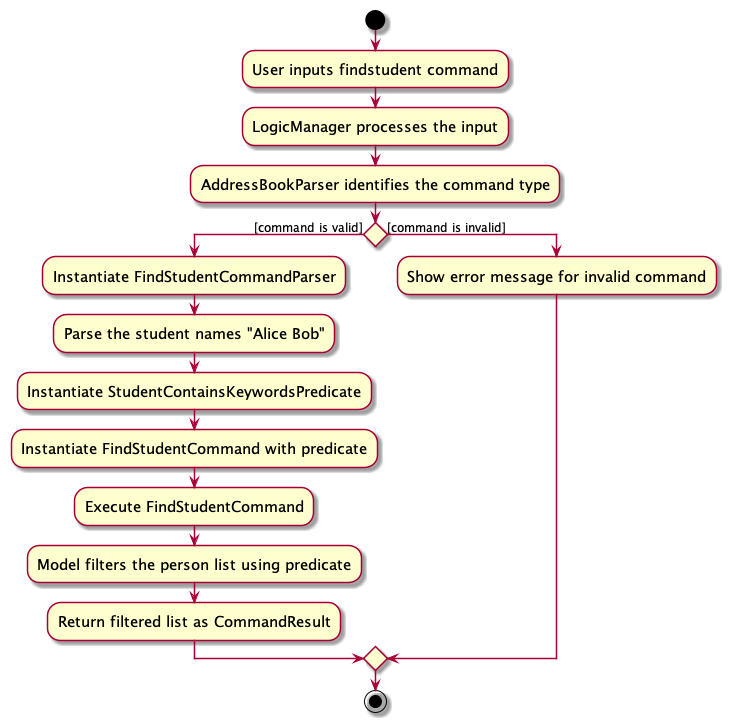
4.4.2 Design considerations:
Aspect: How filter is done:
-
Alternative 1 (current choice): Use a predicate object (
NameContainsKeywordsPredicate) to handle filtering.- Pros: Modular approach. Easy to extend with more search features in the future. Decouples filtering logic from the command itself.
- Cons: Might be over-engineered if no other search features are planned.
-
Alternative 2: Implement filtering logic directly within the
FindCommand.- Pros: Simpler without the need for additional objects or classes.
- Cons: Makes the command class more complex. Harder to extend with more search features in the future.
Aspect: Case-sensitivity in search:
-
Alternative 1 (current choice): Case-insensitive search.
- Pros: Offers flexibility and a better user experience. Users do not need to worry about the exact casing of student names.
- Cons: Might yield results that the user was not expecting if there are student names with varied casing.
-
Alternative 2: Case-sensitive search.
- Pros: Precise search results based on exact casing.
- Cons: Less flexible. Users need to input the exact casing of student names.
4.5 Sort feature
4.5.1 Implementation
The sort feature sorts the students in the UniquePersonList object in AddressBook according to a specified sorting criterion.
The sorting mechanism is facilitated by SortCommandParser and SortCommand. The latter extends the existing Command class and implements the following method:
-
SortCommand#execute(): Executes the sort command and returns the result message.
After the user specifies the sorting criterion, the corresponding subclass of PersonSorter will be instantiated. There are different PersonSorter objects that each sorts differently. The PersonSorter object, which implements the Comparable interface, directly sorts the UniquePersonList object in AddressBook.
Format: sort SORT_CRITERION
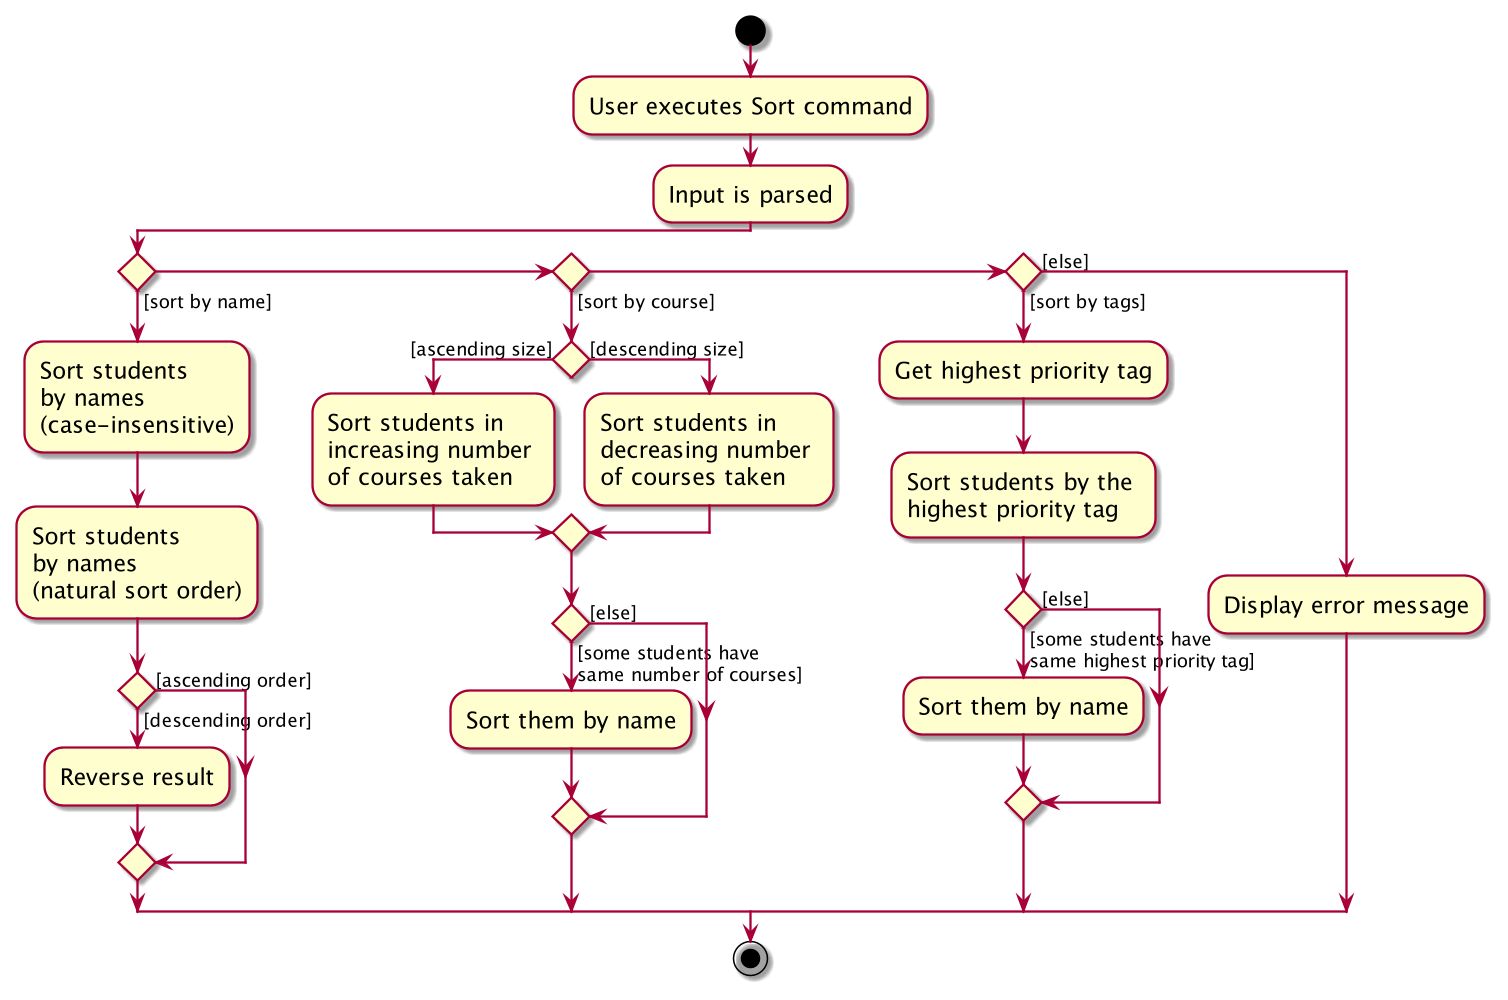
There are 3 ways to sort the students in NUSCoursemates:
-
Sort by Name
- Function: Sorts students by name in alphabetical order
- Criterion:
name,name-ascending,name-descending - Example usage:
sort name-ascending
-
Sort by Course size
- Function: Sorts students by the number of courses taken
- Criterion:
course,course size-ascending,course size-descending - Example usage:
sort course size-ascending
-
Sort by Tags
- Function: Sorts students by their tags
- Criterion:
tags - Example usage:
sort tags
Given below is an example usage scenario and how the sort mechanism behaves at each step.
Step 1. The user will input sort name, where sort is the command word and name is a valid sort criterion.
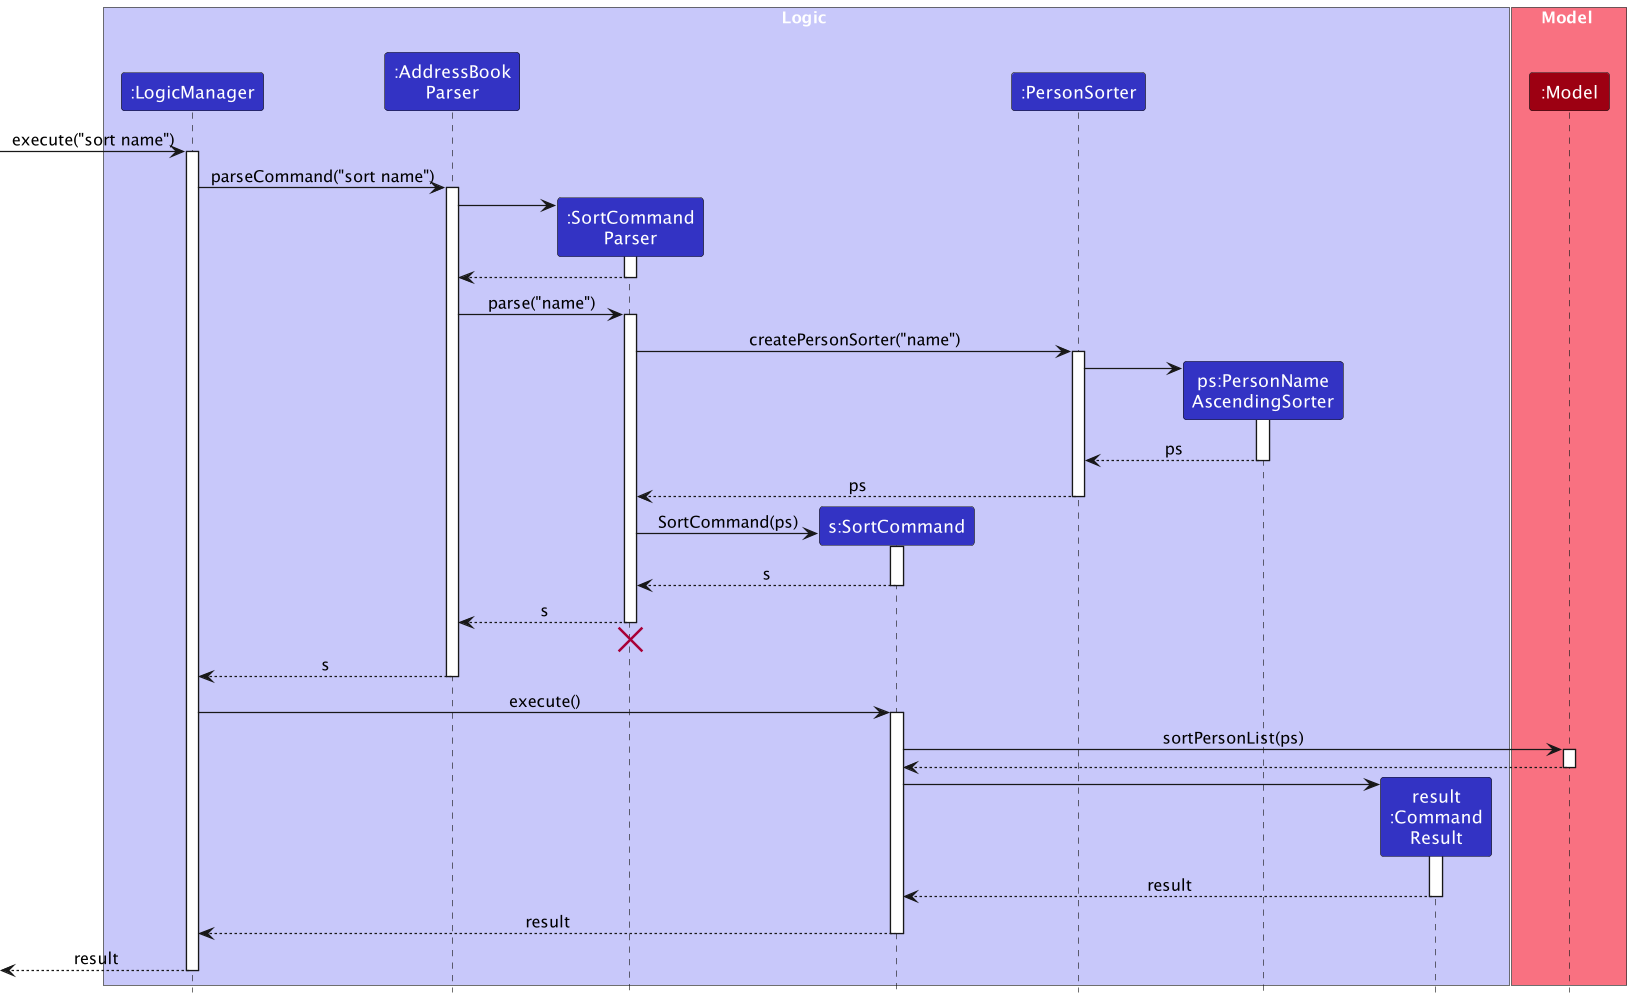
Step 2. When LogicManager is called upon to execute the command, it will call parseCommand() of an AddressBookParser object which creates a SortCommandParser object.
Step 3. SortCommandParser will then parse the sort criterion, which in this case, is name.
Step 4. The createPersonSorter() method of the PersonSorter class is called along with the sort criterion.
Step 5. A new PersonNameAscendingSorter object is constructed.
Step 6. A new SortCommand object is constructed with the PersonNameAscendingSorter object created in the previous step.
Step 7. The SortCommand object is then executed by the LogicManager.
Step 8. As a result, the SortCommand object will call Model#sortPersonList() with the PersonNameAscendingSorter object created in the earlier steps.
The following UML Sequence diagram shows what happens when sort name is entered as an input up to this step.
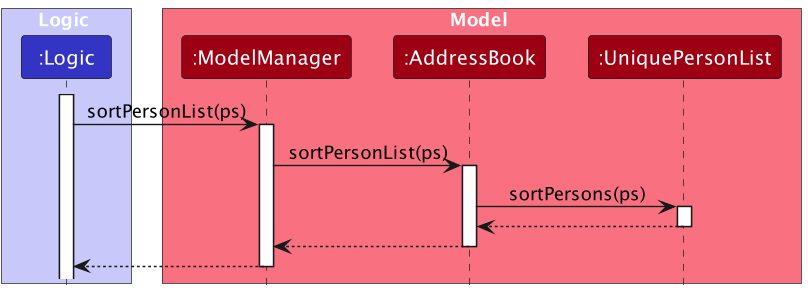
Step 9. Afterwards, AddressBook#sortPersonList() is called with the same PersonNameAscendingSorter object.
Step 10. Consequently, UniquePersonList#sortPersons() is called with the PersonNameAscendingSorter object that sorts the list. As a result, we get a list that is sorted according to the specified sort criterion.
The following UML Sequence diagram shows what happens within the Model component.
Step 11. Finally, after the sorting process is successful, the result of the sort command execution is encapsulated as a CommandResult object which is returned back from Logic.
![]() Note:
Note:
- The lifeline for
SortCommandParsershould end at the destroy marker (X) but due to a limitation of PlantUML, the lifeline reaches the end of diagram.
The following UML Activity diagram shows the workflow of sorting students in NUSCoursemates, based on different sorting criterion:
4.5.2 Design considerations:
Aspect: How the sorted list should be stored.
Alternative 1 (current choice): Sort the UniquePersonList object directly. This means that the original list will be modified as it is sorted. The resulting list is stored locally.
- Pros: Since the resulting list is stored locally, the user’s preference is saved because he is able to see the same sorted list the next time he opens the application.
- Pros: Smaller memory usage because there is no need to store copies of the lists are stored.
- Cons: Potentially slower because the list is modified locally.
Alternative 2: Make a copy of the original list for sorting before saving it.
- Pros: Original list is recoverable in case of an error.
- Cons: More memory required to store copies of the original and sorted list.
- Cons: Less efficient as it takes time to copy the list.
- Cons: Prone to errors that may arise from the copying stage, as the list to be copied from and the list to be copied to will always change.
Ultimately, Alternative 1 is chosen over Alternative 2. Since the application is being used frequently, the user’s preference should be saved so that he does not need to run the sort command again to see a sorted list.
Moreover, there are checks and error handling to ensure that the PersonSorter objects are able to sort the list correctly.
4.6 Tag feature
4.6.1 Implementation
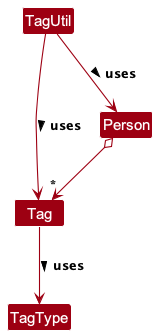
The Tag feature is facilitated by the Tag class, which contains an attribute TagType to determine the type of tag. The creation and validation of tags are significantly associated with the TagUtil class.
-
TagUtil#canAddOrEditEmergencyTag(Person toAdd, List<Person> currentPersonList)— Determines if a new “Emergency” tag can be added or edited based on existing contacts with the “Emergency” tag. -
Tag#isEmergencyTag()— Checks if a tag is of the type “Emergency”.
Given below is an example usage scenario and how the Tag mechanism behaves at each step.
Step 1. The user wishes to add a new contact with a tag “Emergency”. They execute the add command: add n/John Doe p/12345678 t/Emergency.
Step 2. The LogicManager receives this command string and passes it to the AddressBookParser.
Step 3. The AddressBookParser identifies the type of command and invokes the relevant parser, in this case, AddCommandParser, to process the command details.
Step 4. The AddCommandParser processes the input, and if a tag is provided, a new Tag object is created.
Step 5. Before the Person object is created, the TagUtil#canAddOrEditEmergencyTag() method is called to ensure not more than two contacts have the “Emergency” tag.
Step 6. If the validation is successful, a new Person object is created with the provided details, including the tag, and added to the model. Otherwise, a CommandException is thrown, notifying the user of the error.
Step 7. The result, a successful addition or an error message, is displayed to the user.
The following class diagram shows the overview of the Tag mechanism.
The following sequence diagram shows how the Tag operation works by calling the add Command:

![]() Note:
Note:
- For simplicity in the diagrams, all interactions with different components of the Logic are represented under a single ‘Logic’ participant.
The following activity diagram summarizes what happens when a user executes a new add command; the edit command will be similar:
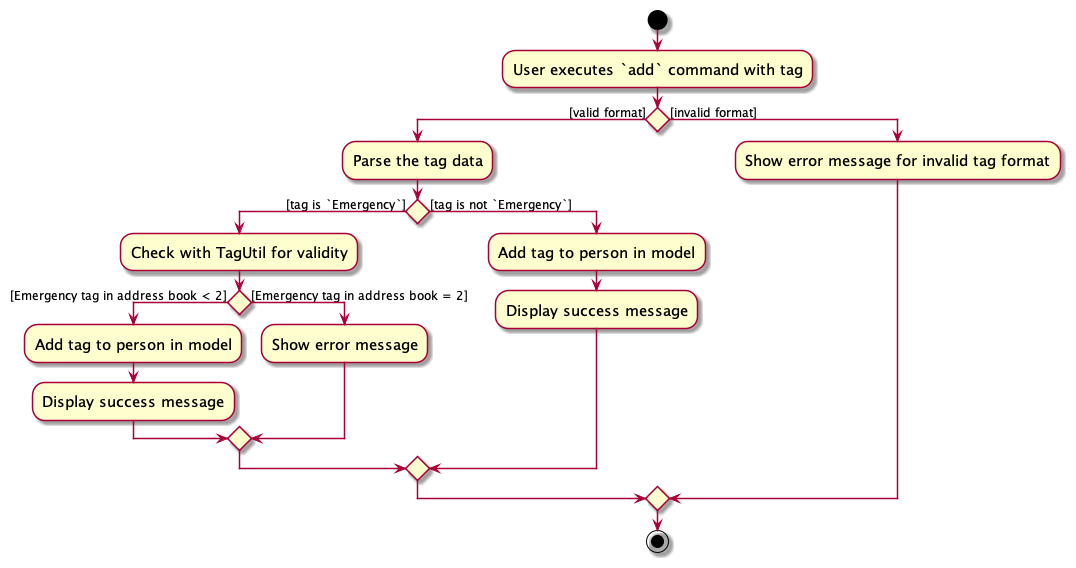
4.6.2 Design considerations:
Aspect: Validation of the “Emergency” tag count:
-
Alternative 1 (current choice): Use a utility class (
TagUtil) to check the constraints.- Pros: Modular approach. Decouples the tag validation logic from the command classes. Easier to maintain and extend if more constraints are introduced in the future.
- Cons: Another layer of abstraction. Might be an overkill if no other tag constraints are planned.
-
Alternative 2: Implement the validation logic within the
AddCommandclass.- Pros: Simpler approach without additional utility classes. Direct handling within the main command.
- Cons: Makes the command class more complicated. Difficult to maintain and extend if more constraints on tags are added in the future.
Aspect: Extensibility of tags:
-
Alternative 1 (current choice): Use an enumeration (TagType) to define types of tags.
- Pros: Clean and organized. Easy to add more types of tags in the future. Validation can be done based on enum values.
- Cons: Might be restrictive if dynamic creation of new tag types is required in the future.
-
Alternative 2: Store tag types as strings without an enumeration.
- Pros: Dynamic creation of new tag types without changing the code.
- Cons: Difficult to validate and handle specific tag types. Potential for typos and inconsistencies.
Aspect: Types and Limitations of Tags:
-
Alternative 1 (current choice): Limit the system to three specific types of tags.
- Pros: Ensures that the tags used are relevant to the application’s main purpose, which is to manage coursemates’ contact information.
- Pros: Simplifies the interface and experience for the user, ensuring consistency.
- Pros: Reduces clutter and potential misuse by preventing users from adding arbitrary tags
- Cons: Users might find it restrictive if they wish to add more customized tags for further categorization.
- Cons: Possible need for future extensions or adjustments if more relevant tag categories emerge.
-
Alternative 2: Allow users to add any type of tags.
- Pros: Provides flexibility for users to categorize their contacts as they see fit.
- Pros: Avoids potential limitations, giving room for diverse usage scenarios.
- Cons: Might deviate from the main purpose of the application, leading to inconsistent use.
- Cons: Users might add unrelated or inappropriate tags, leading to clutter.
4.7 Telehandle feature
4.7.1 Implementation
The Telehandle mechanism is facilitated by the Telehandle and AddCommand classes.
Given below is an example usage scenario and how the Telehandle mechanism behaves at each step.
Step 1. The user wishes to add a new contact with their desired Telehandle. They execute the add command: add n/john p/98765432 th/@john2.
Step 2. The LogicManager receives this command string and passes it to the AddressBookParser.
Step 3. The AddressBookParser identifies the type of command and invokes the relevant parser, in this case, AddCommandParser, to process the command details.
Step 4. The parser AddCommandParser will then parse the command and create objects for each field. Telehandle will be indicated by the th/ prefix.
For this scenario, we will be focusing on the Telehandle.
Step 5. The AddCommandParser processes the input and if a Telehandle is provided, the ParserUtil#parseTelehandle() method will then be invoked within AddCommandParser, else an empty Telehandle would be created instead.
Step 6. Using all the parsed fields (Name, Phone, Email, Address, Telehandle, Tag, Courses), a Person object is constructed.
Step 7. This results in a AddCommand object which is executed by the LogicManager.
Step 8. The command will communicate with the Model to add a person with the inputted Telehandle.
Step 9. Upon success, the result of the command execution is encapsulated as a CommandResult object which is returned back from Logic.
The following sequence diagram shows how the Telehandle works through the AddCommand:
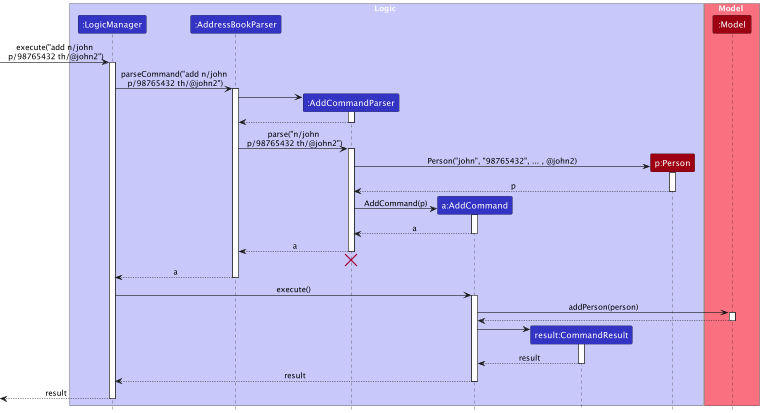
![]() Note:
Note:
- The lifeline for
AddCommandParsershould end at the destroy marker (X) but due to a limitation of PlantUML, the lifeline reaches the end of diagram. - During the
AddCommandParser,Name, Phone, Email, Address, Telehandle, Tag, Courseobjects are created as well but due to space constraint and simplification, the details have been omitted - There are other classes in
Logic(omitted from the class diagram above) that are used for parsing a user command and can be found here
The following object diagram below shows the new Person object created when the user executes the Add command with a valid Telehandle.
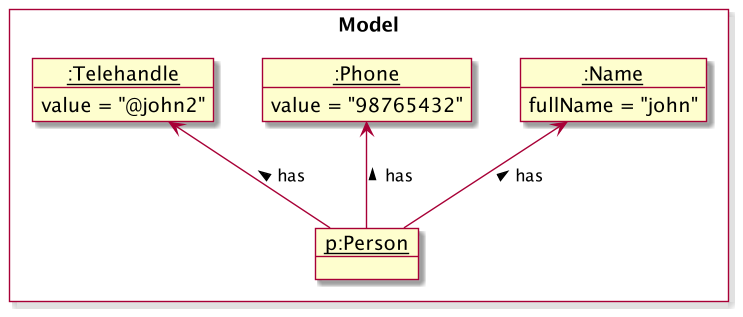
4.7.2 Design considerations:
Aspect: Input constraints in Telehandle:
-
Alternative 1 (current choice): Requiring an @ sign in front of all
Telehandlefields.- Pros: Increased clarity. The “@” sign provides a clear visual cue that the input is a
Telehandle, helping users distinguish it from other fields such asAddress. - Cons: Requiring an “@” sign may be unusual for users who are not familiar with social media or who have not encountered this format before. This requirement may feel counterintuitive to some.
- Pros: Increased clarity. The “@” sign provides a clear visual cue that the input is a
-
Alternative 2: Not requiring an @ sign in front of all
Telehandlefields.- Pros: Offers flexibility and a better user experience.
- Cons:
Telehandlefields that rely solely on user input may not differ significantly from other types of user-provided data such asAddressandEmail. This may cause confusion to the users when viewing the details
4.8 Feedback feature
4.8.1 Implementation
The Feedback mechanism is facilitated by FeedbackCommand.
Given below is an example usage scenario and how the Feedback mechanism works at each step.
Step 1. The user wishes to send a feedback in regard to the app. They execute the feedback command.
Step 2. The LogicManager receives this command string and passes it to the AddressBookParser.
Step 3. The AddressBookParser identifies the type of command and invokes the relevant command, in this case,
FeedbackCommand.
Step 4. This results in a FeedbackCommand object which is executed by the LogicManager.
Step 5. The result of the command execution is encapsulated as a CommandResult object which is returned back from LogicManager.
Step 6. Then the CommandResult object will cause the MainWindow#handleFeedback() to be executed.
Step 7. The Ui will be updated, and the success message will be displayed to the user.
Step 8. Lastly, the Feedback popup window will appear.
The following sequence diagram shows how the Feedback operation works:
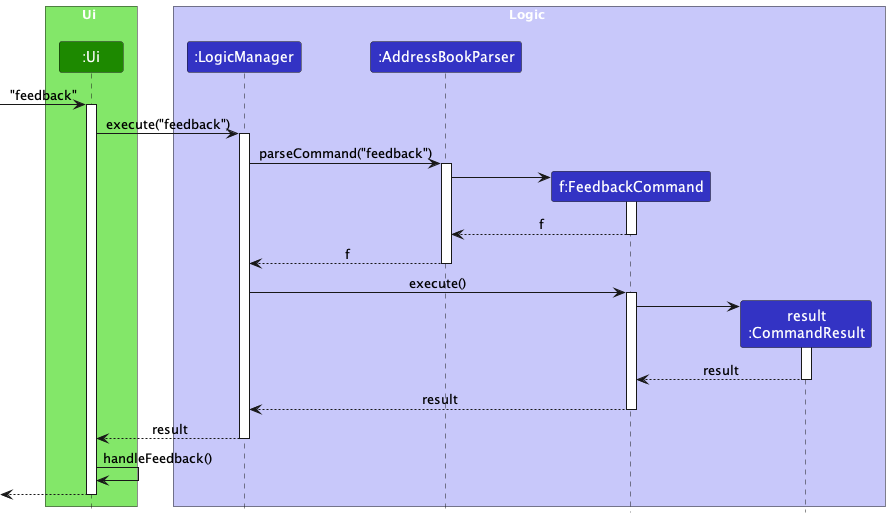
The following activity diagram summarizes what happens when a user executes the Feedback command:
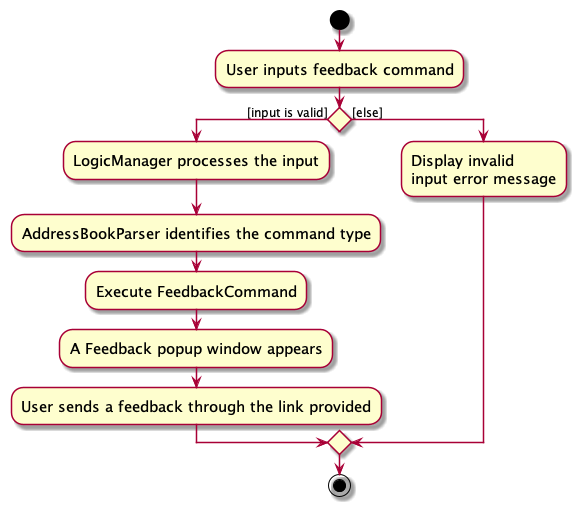
4.8.2 Design considerations:
Aspect: Storage medium for the logging of feedback received
-
Alternative 1 (current choice): Use Google forms to store feedback of the users.
- Pros: Google Forms are quick and easy to set up. No need for extensive development efforts.
- Pros: Google Forms are user-friendly, making it simple for app users to submit feedback without any technical knowledge or app-specific requirements.
-
Pros: Data Organization. Google Forms automatically organize and store feedback responses in a Google Sheets spreadsheet, making it convenient for review and analysis.
- Cons: Data Security. Storing feedback data on external platforms like Google Forms introduces security and privacy concerns.
-
Alternative 2: Link to an online forum where users can post feedback.
-
Pros: Peer Support. In addition to providing feedback, users can help each other by sharing solutions to common issues.
-
Cons: Lack of Control. There would be lesser control over the structure and organization of feedback compared to a dedicated feedback form.
-
4.9 Theme feature
4.9.1 Implementation
The change theme mechanism is facilitated by ThemeCommand. It extends Command which implements the following operation:
-
ThemeCommand#execute():Changes the Theme of NUSCoursemates
Given below is an example usage scenario and how the theme mechanism behaves at each step.
Step 1. The user launches the application for the first time. The current default theme will be a light theme.
Step 2. The user executes theme DARK command to change the theme from light to dark.
Step 2. When LogicManager is called upon to execute the command, it will pass it to an AddressBookParser
object which will call parseCommand() which creates a parser ThemeCommandParser and uses it to parse the command.
Step 3. This results in a ThemeCommand object which is executed by the LogicManager.
Step 4. The result of the command execution is encapsulated as a CommandResult object which is returned back from LogicManager.
Step 5. The CommandResult object will cause MainWindow#handleTheme() to be executed.
Step 6. The Ui will then be updated to DARK theme.
The following sequence diagram shows how the theme operation works:
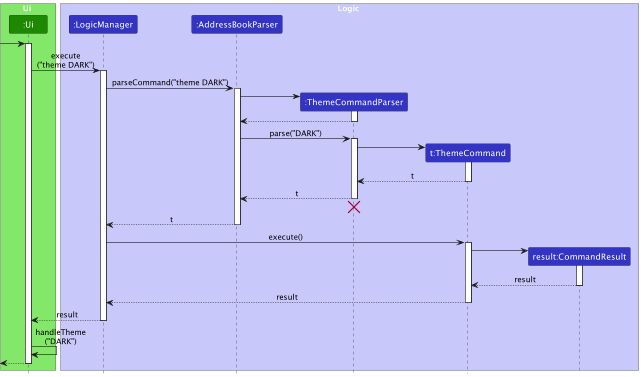
![]() Note:
Note:
- The lifeline for
ThemeCommandParsershould end at the destroy marker (X) but due to a limitation of PlantUML, the lifeline reaches the end of diagram. - There are other classes in
Logic(omitted from the class diagram above) that are used for parsing a user command and can be found here
The following activity diagram summarizes what happens when a user executes the theme command:
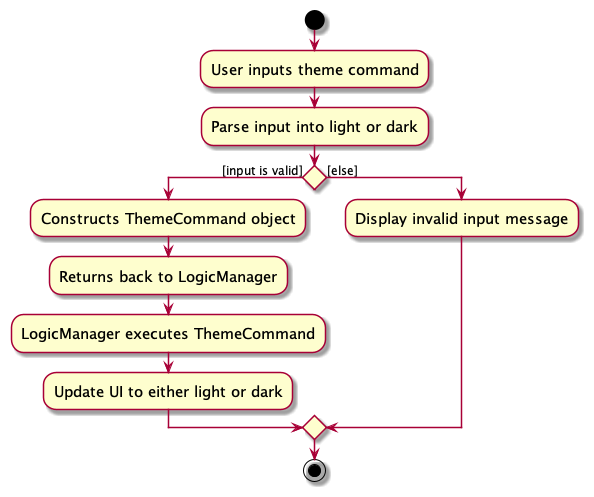
4.9.2 Design considerations:
Aspect: User Interaction for Theme Change
-
Alternative 1: CLI Command.
- Pros: Consistency. Aligns with the CLI nature of the application, providing a consistent interface for users accustomed to command-based interactions.
-
Pros: Efficiency. Users familiar with CLI commands can quickly change the theme without navigating through graphical menus.
- Cons: Learning Curve. Users unfamiliar with CLI commands may face a learning curve.
-
Alternative 2: Menu Bar Button.
-
Pros: Intuitiveness. A graphical button on the menu bar may be more intuitive for users who prefer visual interactions.
-
Cons: Inconsistency. May deviate from the overall CLI theme of the application.
-
-
Alternative 3 (current choice): Hybrid Approach - CLI Command and Graphical Button.
- Pros: Flexibility. Providing both options caters to a wider audience, accommodating users with different preferences.
- Pros: User Preference. Users can choose their preferred method of interaction, enhancing the overall user experience.
-
Pros: Discoverability. The graphical button enhances discoverability for users who might not be familiar with CLI commands.
- Cons: Development Effort. Implementing and maintaining both CLI and graphical options may require additional development effort.
4.10 Course List Panel and Tag List Panel Feature
NUSCoursemates comes with three major List Panels — PersonListPanel, CourseListPanel, and TagListPanel as stated above.
The three panels can be seen in the UI below:
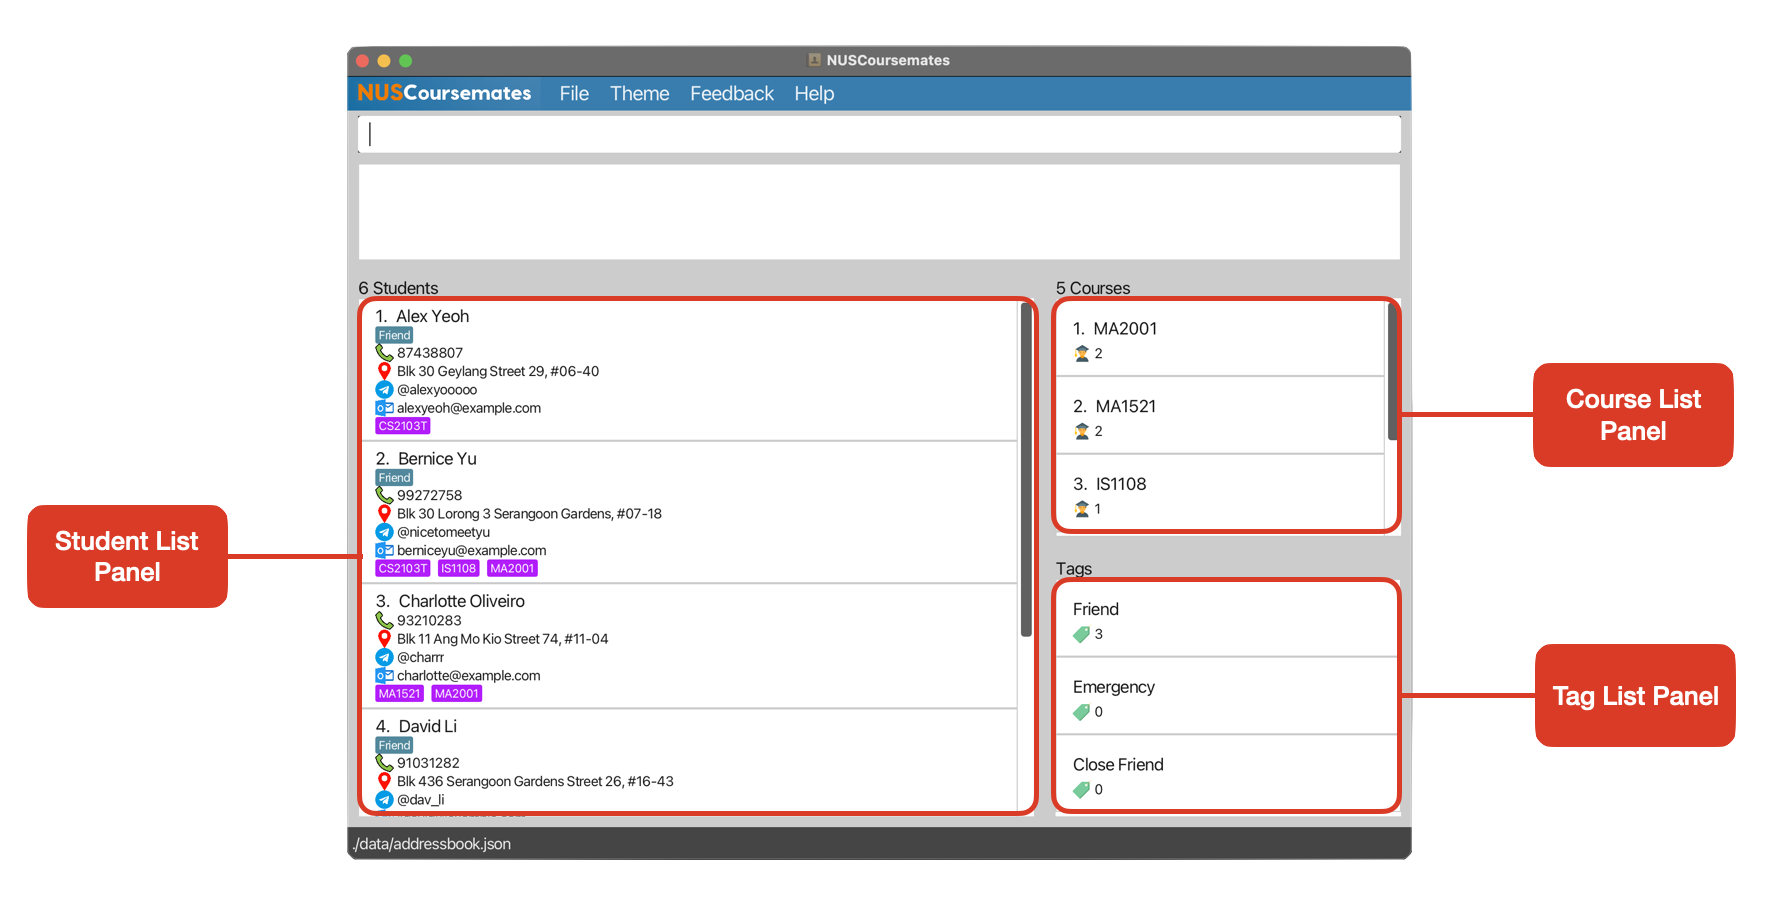
4.10.1 Implementation
The panels mechanism is facilitated by MainWindow. It houses the three following panels:
-
PersonListPanel: Displays the list of all the students -
CourseListPanel: Displays the list of the summary of courses -
TagListPanel: Displays the list of the summary of tags
Course List Panel (CourseListPanel):
The CourseListPanel class is implemented as a JavaFX component responsible for presenting a summarised list of courses.
It uses a ListView to display each course, with each item represented by a CourseCard.
The CourseCard class encapsulates the visual representation of a course, displaying the course name
and the number of students taking the course. The panel is dynamically updated by binding
it to an ObservableList<Pair<String, Integer>>, where each pair represents the string of the course and the
integer corresponds to number of students taking that course. The CourseListViewCell class which extends the ListCell,
controls the rendering of each course item in the list.
Tag List Panel (TagListPanel):
Similar to the CourseListPanel, the TagListPanel is implemented as a JavaFX component utilising a ListView
to display a summarised list of tags. Each tag is represented by TagCard.
The panel is linked to an ObservableList<Pair<String, Integer>> containing tag names and number of students having the tag names,
and the TagListViewCell class customises the rendering of each tag item.
4.10.2 Design considerations:
Aspect: Unified Panel for Tags and Courses
-
Alternative 1 (current choice): Separate Panels for Tags and Courses
- Pros: Distinct Categorization. Maintaining separate panels ensures clear categorization.
-
Pros: Focused Interaction. Users interact with tags and courses in dedicated spaces.
- Cons: Increased Navigation Steps. Users need to switch between panels for tags and courses, potentially adding extra steps.
-
Alternative 2: Merge Tags and Courses into a Unified Panel
- Pros: Simplicity. Combining tags and courses into a single panel simplifies the interface.
-
Pros: Streamlined Navigation. Users access both tags and courses from one centralised location.
- Cons: Potential Information Overload.
5. Documentation, logging, testing, configuration, dev-ops
Appendix A: Requirements
A.1 Product scope
Target user profile:
- is a School of Computing (SoC) student in NUS
- takes a number of courses in NUS
- has a need to manage a significant number of contacts
- prefer desktop apps over other types
- can type fast
- prefers typing to mouse interactions
- is reasonably comfortable using CLI apps
Value proposition:
Students in SoC often face the challenge of identifying classmates who share their course schedules. NUSCourseMates is designed to alleviate this difficulty by helping them connect with peers who are taking the same courses, which can be a particularly valuable resource when assessments involve group work.
A.2 User stories
Priorities: High (must have) - * * *, Medium (nice to have) - * *, Low (unlikely to have) - *
| Priority | As a … | I want to … | So that I can… |
|---|---|---|---|
* * * |
SoC Student | add/create a student and the courses they take | save their details in my address book |
* * * |
Forgetful SoC student | have a one-stop place to view all the courses my friends are taking this semester | try to go to class with them together |
* * * |
Organised SoC student | delete a contact in my address book | keep my address book clutter-free from the people I am no longer friends with |
* * * |
Novice with limited knowledge of CLI | easily handle the various commands | smoothly navigate the address book |
* * * |
First-time user of the app | easily handle the various commands | smoothly navigate the address book |
* * * |
SoC Student | add contact details (telehandle, phone number) of student into the student’s profile | contact the student in another way |
* * |
Blur SoC student | read the user guide | learn to use the application. |
* * |
Unorganised SoC student | sort the courses by sizes | find a student with more similar courses |
* * |
SoC Student | sort my friends by alphabetical order | find a specific friend easily |
* * |
Unorganised SoC student | filter the address book by course | find and track other students taking the same course as me |
* * |
SoC Student | leave some data fields blank when adding a friend | add my friend even if I do not have all their personal details |
* * |
Overwhelmed SoC student | view the contact details of a student | contact them via their email or phone anytime if required |
* * |
SoC Student | add the detail of my friend’s tutorials | know which tutorial they choose |
* * |
SoC Student | remove friend from my friend’s list | keep my address book’s contact list relevant |
* * |
SoC Student | tag the course according to the semester in which it was taken | differentiate between friends who are taking the course now and in the past |
* * |
Careless SoC Student | undo commands I made | have a better user experience |
* * |
SoC student with a huge social circle | view the total number of users in the address book | have a good idea of how many users are in the address book |
* * |
SoC Student | give feedback to the developers | feedback any bugs or problems I faced while using the app |
* |
Confused SoC student | look at the common FAQs in the User Guide | get a better understanding of some of the features of the app to use the app more seamlessly |
* |
SoC Student | add email address of students | easily access the email address of the student |
* |
SoC Student | edit the background of my address book | make my address book looks nicer and personalized |
* |
SoC Student | separate friends list from close friends list | prioritize which class to take |
* |
SoC Student | see my close friends’ courses displayed first before other friends’ courses | easily see which are the classes I should take |
* |
SoC Student | check the history of what contacts have been added | make amendments to the contact list easily |
* |
SoC Student with poor vision | Edit the font size of my address book | see clearer |
* |
SoC Student | change the theme of the app | customize between dark and light themes |
* |
Lazy SoC Student | get recommendations about what course(s) I should take without doing any computation myself | know which classes to take at one glance |
* |
SoC Student | set my friend as an emergency contact | call the person if I face any serious issue |
A.3 Use cases
(For all use cases below, the System is the NUSCoursemates and the Actor is the user, unless specified otherwise)
Use Case: UC01 - Accessing the Help Page
MSS
- User requests to view help window.
-
NUSCoursemates displays a message with a link to the help page.
Use case ends.
Use Case: UC02 - Accessing the Feedback Page
MSS
- User requests to view feedback window.
-
NUSCoursemates displays a message with a link to the feedback form.
Use case ends.
Use Case: UC03 - Adding a Student
MSS
- User requests to add a student with their details.
-
NUSCoursemates adds the student and displays the updated details.
Use case ends.
Extensions
- 1a. User enters an invalid command format.
-
1a1. NUSCoursemates shows an error message.
Use case ends.
-
- 1b. User enters an invalid parameter.
-
1b1. NUSCoursemates shows an error message.
Use case ends.
-
Use Case: UC04 - Listing All Students
MSS
- User requests to view the list of students.
-
NUSCoursemates displays a list of all students along with their details.
Use case ends.
Use Case: UC05 - Deleting a Student
- User requests to list persons (UC04).
- NUSCoursemates shows a list of students.
- User requests to delete a specific person in the list.
-
NUSCoursemates deletes the student.
Use case ends.
Extensions
-
2a. The list is empty.
Use case ends.
-
3a. The given index is invalid.
-
3a1. NUSCoursemates shows an error message.
Use case resumes at step 2.
-
Use Case: UC06 - Editing a Student
MSS
- User requests to list persons (UC04).
- NUSCoursemates shows a list of persons.
- User requests to edit a specific person in the list.
-
NUSCoursemates edits the person.
Use case ends.
Extensions
-
2a. The list is empty.
Use case ends.
- 3a. The given index is invalid.
-
3a1. NUSCoursemates shows an error message.
Use case resumes at step 2.
-
- 3b. The fields are invalid.
-
3b1. NUSCoursemates shows an error message.
Use case resumes at step 2.
-
- 3c. The command format is invalid.
-
3c1. NUSCoursemates shows an error message.
Use case resumes at step 2.
-
Use Case: UC07 - Searching for students by name
MSS
- User requests to find students by their names
-
NUSCoursemates displays matching students with their details.
Use case ends.
Extensions
-
1a. User requests to find students in an empty NUSCoursemates.
Use case ends.
Use Case: UC08 - Searching for students by course
MSS
- User requests to find students by their courses.
-
NUSCoursemates displays matching students with their details.
Use case ends.
Extensions
-
1a. User requests to find students by courses in an empty NUSCoursemates.
Use case ends.
Use Case: UC09 - Clearing All Entries
MSS
- User requests to clear the entire NUSCoursemates.
-
NUSCoursemates removes all students and displays the updated view.
Use case ends.
Extensions
- 1a. The given command is invalid.
-
1a1. NUSCoursemates shows an error message.
Use case ends.
-
Use Case: UC10 - Clearing All Courses
MSS
- User requests to clear all courses from students in NUSCoursemates.
-
NUSCoursemates removes the courses from students and displays the updated view.
Use case ends.
Extensions
- 1a. The given command is invalid.
-
1a1. NUSCoursemates shows an error message.
Use case ends.
-
Use Case: UC11 - Changing Themes
MSS
- User request to change the theme to dark.
-
GUI of the NUSCoursemates changes from light to dark theme.
Use case ends.
Extensions
- 1a. The theme of the NUSCoursemates is already dark.
-
1a1. GUI of the NUSCoursemates does not change.
Use case ends.
-
- 1b. The given command is invalid.
-
1b1. NUSCoursemates shows an error message.
Use case ends.
-
Use Case: UC12 - Exiting the Program
MSS
-
User request to exit the program.
-
NUSCoursemates exits the program.
Use case ends.
Extensions
- 1a. The given command is invalid.
-
1a1. NUSCoursemates shows an error message.
Use case ends.
-
Use Case: UC13 - Sorting NUSCoursemates
MSS
- User requests for a sorted list of students based on a specified sort criterion.
- NUSCoursemates sorts the list of students.
-
The updated list of students is shown to the user.
Use case ends.
Extensions
- 1a. The given command is invalid.
-
1a1. NUSCoursemates displays an error message.
Use case ends.
-
- 1b. The given sort criterion is invalid.
-
1b1. NUSCoursemates displays an error message.
Use case ends.
-
A.4 Non-Functional Requirements
- Should work on any mainstream OS as long as it has Java
11or above installed. - Should be able to hold up to 1000 students without a noticeable sluggishness in performance for typical usage.
- A user with above average typing speed for regular English text (i.e. not code, not system admin commands) should be able to accomplish most of the tasks faster using commands than using the mouse.
- The application should load within 30 seconds upon initiation on a standard modern-day PC.
- The installed application should occupy no more than 100MB of disk space on the user’s computer.
- The application should respond to user inputs within 5 seconds, ensuring a smooth and interactive user experience.
- The application should work on both 32-bit and 64-bit environments.
- The application should be usable by both novice and seasoned Command Line Interface (CLI) users.
- Users should be able to view and edit existing data locally. Changes made are also saved offline and locally.
- The application should only work for a single user. It should not support simultaneous access or user accounts.
A.5 Glossary
- SoC: School of Computing, the computing faculty in National University of Singapore (NUS)
- NUS: Abbreviation for the National University of Singapore
- Mainstream OS: Windows, Linux, Unix, OS-X
- Tag: A label or keyword assigned to a contact in an NUSCoursemates, to categorize, annotate, or identify specific characteristics or affiliations of that person.
- Command Line Interface (CLI): A text-driven user interface used for program execution, file management, and overall computer interaction.
- Graphical User Interface (GUI): An operating system interface reliant on graphics, utilising icons, menus, and a mouse for user interaction.
- Main Success Scenario (MSS): Describes the most direct interaction path for a given use case, assuming no errors or complications.
- Actor: Within use cases, an actor represents the role a person assumes while interacting with the system.
- Application Programming Interface(API): Facilitates communication between distinct components of a program.
- Architecture: In the realm of software, architecture illustrates the systematic organization of the entire system.
- Framework: Comprises pre-written code with predefined classes and functions, aiding developers in constructing software.
Appendix B: Instructions for manual testing
Given below are instructions to test the app manually.
![]() Note:
Note:
- These instructions only provide a starting point for testers to work on; testers are expected to do more exploratory testing.
B.1 Launch and shutdown
-
Initial launch:
- Download the jar file and copy into an empty folder.
- Double-click the jar file.
If nothing happens after double-clicking the jar file, runjava -jar NUSCoursemates.jarin the folder containing the jar file.
Expected Outcome: Shows the GUI with a set of sample contacts. The window size may not be optimum.
-
Saving window preferences:
- Resize the window to an optimum size. Move the window to a different location. Close the window.
- Re-launch the app by double-clicking the jar file.
Expected Outcome: The most recent window size and location is retained.
B.2 List all students
Prerequisites: There should be at least one student in NUSCoursemates.
- Listing all students:
-
Test case:
list
Expected Outcome: All students are listed in the left panel. -
Test case:
list 1,list 3h4fk4hr
Expected Outcome: Same as before.
-
Test case:
B.3 Help
- Seeking help:
-
Test case:
help
Expected Outcome: A new window is opened. A link to the help page is provided. An acknowledgement message “Opened help window.” is shown. -
Test case:
help 1,help 3h4fk4hr
Expected Outcome: Same as before.
-
Test case:
B.4 Feedback
- Providing feedback:
-
Test case:
feedback
Expected Outcome: A new window is opened. A link to the feedback page is provided. An acknowledgement message “Opened feedback window.” is shown. -
Test case:
feedback 1,feedback qefjhbcvhj
Expected Outcome: Same as before.
-
Test case:
B.5 Adding a student
- Adding a student with only compulsory fields specified:
-
Test case:
add n/John Doe p/81234567
Expected Outcome: A new student with the provided name and phone number is added to the bottom of the left panel. All optional fields such as address, email, and course are left blank.
-
Test case:
- Adding a student with all compulsory fields and some optional fields specified:
-
Test case:
add n/Mary Tan p/81234567 e/mtan@gmail.com a/123 NUS Rd th/@maryyy c/CS1231S c/CS2103T
Expected Outcome: A new student with the provided details is added to the bottom of the left panel. Only some fields are populated with the provided details.
-
Test case:
- Adding a student with all compulsory and optional fields specified:
-
Test case:
add n/Bob Lee p/91234567 e/BL@gmail.com a/123 Clementi Rd th/@boblee t/close friend c/CS2030S c/CS2040S
Expected Outcome: A new student with the provided details is added to the bottom of the left panel. All fields are populated with the provided details.
-
Test case:
- Adding a student with compulsory fields missing:
-
Test case:
add n/Bobby Lim
Expected Outcome: The command entered is now highlighted in red. An error message is shown, stating that the command format is invalid. The command format and an example is also shown in the error message. -
Test case:
add n/
Expected Outcome: Same as previous.
-
Test case:
- Adding a student with an invalid field:
-
Test case:
add n/!@#$%#$#$ p/91234567
Expected Outcome: The command entered is now highlighted in red. An error message is shown, stating that the format for the name is invalid.
-
Test case:
B.6 Editing a student
Prerequisites: Completed all steps in the previous sections and have at least 3 student records stored. Afterwards, enter the list command to view the student records. Repeat this for every test case.
-
Editing a student with a valid index and at least one field specified:
-
Test case:
edit 1 e/random@gmail.com a/123 Clementi Rd
Expected Outcome: The email and address fields for the first student in the left panel is updated with the new information provided. All other fields remain unchanged. -
Test case:
edit 2 e/ a/ th/
Expected Outcome: The email, address and telehandle fields for the second student in the left panel are cleared. All other fields are left unchanged. -
Test case:
edit 3 c/add-ec2101 c/add-ec2102
Expected Outcome: These 2 courses are listed in the record of the third student. All other fields are unchanged.
-
- Editing a student with a valid index but invalid fields are specified:
-
Test case:
edit 2 n/
Expected Outcome: The command entered is now highlighted in red. An error message is shown stating the correct requirements for the name field. -
Additional prerequisite: The first student does not take course
EC2101.
Test case:edit 1 c/del-ec2101
Expected Outcome: The command entered is now highlighted in red. An error message is shown, stating that the student does not have courseEC2101.
-
Test case:
- Editing a student with an invalid index specified:
-
Test case:
edit x n/Johnny Tan, wherexis larger than the total count of students.
Expected Outcome: The command entered is now highlighted in red. An error message is shown, stating that the person index provided is invalid.
-
Test case:
- Editing a student with only a valid index specified:
-
Test case:
edit 3
Expected Outcome: The command entered is now highlighted in red. An error message is shown, stating that at least one field to edit must be provided.
-
Test case:
B.7 Deleting a student
Prerequisites: There should be at least 3 student records stored.
Enter the list command to view the student records. Repeat this for every test case.
- Deleting a student with a valid index:
-
Test case:
delete 1
Expected Outcome: First student in the list is deleted. Details of the deleted student are shown in the status message.
-
Test case:
- Deleting a student with an invalid index:
-
Test case:
delete 0
Expected Outcome: No student is deleted. An error message is displayed, stating that the command format is invalid. -
Test case:
delete x, wherexis larger than the total student count.
Expected Outcome: No student is deleted. An error message is displayed, stating that the person index provided is invalid.
-
Test case:
- Deleting a student with no index provided:
-
Test case:
delete
Expected Outcome: No student is deleted. An error message is displayed, stating that the command format is invalid.
-
Test case:
B.8 Finding a student
Prerequisites: Enter the list command to view the student records. Repeat this for every test case.
- Finding students that exist:
-
Additional prerequisite: There exists at least one student whose name contains
John
Test case:findstudent john
Expected Outcome: The left panel shows the list of students whose names includejohn(case-insensitive).
-
Additional prerequisite: There exists at least one student whose name contains
- Finding multiple students by name:
-
Additional prerequisite: There exist students named
BobandDoe
Test case:findstudent bob doe
Expected Outcome: The left panel shows the list of students whose names include eitherBob,Doe, or both (case-insensitive).
-
Additional prerequisite: There exist students named
- Finding a student that does not exist:
-
Additional prerequisite: All students’ names do not contain
Mary
Test case:findstudent mary
Expected Outcome: The left panel is empty.
-
Additional prerequisite: All students’ names do not contain
B.9 Finding a course
Prerequisites: Enter the list command to view the student records. Repeat this for every test case.
- The course is taken by at least one student:
-
Additional prerequisite: There exists a course
MA1521which is taken by at least one student
Test case:findcourse ma1521
Expected Outcome: The left panel shows the list of students who are taking the specified course. -
Additional prerequisite: There exists at least one course starting with
MA15which is taken by at least one student
Test case:findcourse ma15
Expected Outcome: The left panel shows the list of students who are taking any course that starts withMA15.
-
- Finding students enrolled in multiple courses:
-
Additional prerequisite: There exist courses
MA1521andMA1522which are each taken by at least one student Test case:findcourse ma1521 ma1522
Expected Outcome: The left panel shows the list of students who are taking any of the specified courses.
-
Additional prerequisite: There exist courses
- The course is not taken by any student:
-
Additional prerequisite: All students do not take
EC3102
Test case:findcourse ec3102
Expected Outcome: The left panel is empty.
-
Additional prerequisite: All students do not take
B.10 Sort by name
Prerequisites: There should be at least 3 student records stored.
- Valid sort criterion is provided:
-
Test case:
sort nameorsort name-ascending
Expected Outcome: The left panel shows the students’ names arranged in alphabetical order.
-
Test case:
- Additional sort criterion is specified:
-
Test case:
sort name-descending
Expected Outcome: The left panel shows the students’ names arranged in reverse alphabetical order.
-
Test case:
- Invalid or missing sort criterion:
-
Test case:
sort name-random
Expected Outcome: The list of students remains unchanged. An error message is displayed, stating that the command format is invalid. It also provides the command format and an example. -
Test case:
sort
Expected Outcome: Same as above.
-
Test case:
B.11 Sort by course size
Prerequisites: There should be at least 3 student records stored, with varying number of courses taken for each student.
- Valid sort criterion is provided:
-
Test case:
sort courseorsort course size-descending
Expected Outcome: The left panel shows the students’ arranged in decreasing number of courses taken.
-
Test case:
- Additional sort criterion is specified:
-
Test case:
sort course size-ascending
Expected Outcome: The left panel shows the students’ arranged in increasing number of courses taken.
-
Test case:
- Invalid sort criterion is provided:
-
Test case:
sort course random
Expected Outcome: The list of students remains unchanged. An error message is displayed, stating that the command format is invalid. It also provides the command format and an example.
-
Test case:
B.12 Sort by tags
Prerequisites: There should be at least 3 student records stored, with different tags attached to each student.
- Valid sort criterion is provided:
-
Test case:
sort tags
Expected Outcome: The left panel shows the students’ arranged in order of decreasing tag importance.
-
Test case:
- Invalid sort criterion is provided:
-
Test case:
sort tags random
Expected Outcome: The list of students remains unchanged. An error message is displayed, stating that the command format is invalid. It also provides the command format and an example.
-
Test case:
B.13 Clearing courses
Prerequisites: There should be multiple students with at least one course added. Otherwise, add courses for these students with edit command. Repeat this for every test case.
- Valid command
-
Test case:
clear-courses
Expected Outcome: Courses are removed for every student. A message is displayed, stating that all courses have been cleared. -
Test case:
clear-courses ekvbe
Expected Outcome: Same as above.
-
Test case:
B.14 Changing themes
- Valid theme:
-
Test case:
theme dark
Expected Outcome: The GUI enters the dark theme. Student records remain unchanged. -
Test case:
theme light
Expected Outcome: The GUI enters the light theme. Student records remain unchanged.
-
Test case:
- Invalid theme specified:
-
Test case:
theme yellow
Expected Outcome: An error message is displayed, stating that the command format is invalid. The command format and an example are provided. -
Test case:
theme dark 123
Expected Outcome: Same as above.
-
Test case:
B.15 Clearing all students
Prerequisites: There should be multiple students already stored.
- Clearing students:
-
Test case:
clear
Expected Outcome: All students are cleared, and NUSCoursemates is now empty. -
Test case:
clear 1,clear qefjhbcvhj
Expected Outcome: Same as before.
-
Test case:
B.16 Issues with saving data
-
Dealing with missing data file:
Test case: Remove the data file to simulate a missing file
- Go to the location of the data file indicated in the bottom left corner of the application.
- Delete the file named
addressbook.json. - Relaunch NUSCoursemates.
Expected Outcome: A new file with sample student records is created. Sample student records are shown in the application.
-
Dealing with corrupted file:
Test case: Modify the data file to simulate a corrupted data file- Go to the location of the data file indicated in the bottom left corner of the application.
- Open the file named
addressbook.json. - Modify the file. For example, you could remove the first few lines of the file.
- Relaunch NUSCoursemates.
Expected Outcome: The left panel is now empty. No student records are shown in the application.
Appendix C: Planned Enhancements
C.1 Allow Duplicate Student Names
The current implementation of the Address Book in NUSCoursemates restricts users from adding multiple students who share the same name. This limitation can be problematic as it does not reflect real-world scenarios where multiple students might have identical names, hindering the user’s ability to accurately manage their contacts in such cases.
- Proposed Enhancement:
- To improve user experience and reflect real-world scenarios more accurately, we propose an enhancement to the NUSCoursemates feature that will allow the addition of multiple students with the same name. This change will eliminate the current restriction on duplicate names, ensuring users can manage their contacts more effectively, even in cases of identical names.
- Implementation Details:
- Step 1: Modify the
isSamePersonmethod inPerson.javato no longer consider identical names as a criteria for duplicate entries. - Step 2: Adjust the logic in
UniquePersonList#setPerson()to allow the addition of persons with duplicate names, removing the current check that prevents this. - Step 3: Update relevant documentation and user guides to reflect the new capability of handling duplicate names in the NUSCoursemates, ensuring users are aware of this change and can use it effectively.
- Step 1: Modify the
C.2 Do not allow duplicate Telehandles
The current implementation of the NUSCoursemates allows for duplicate Telegram handles across contacts. This flexibility can lead to confusion and inaccuracies in managing contact information.
- Proposed Enhancement:
- To enhance data integrity and streamline contact management, we are planning to implement a change that enforces the uniqueness of Telegram handles within the Address Book. This improvement will prevent the inclusion of duplicate contact information, ensuring that each entry remains distinct.
- Implementation Details:
- Step 1: In the
Person.java, we will add an additional check in theisSamePersonmethod to check whether theTelehandleadded is equal, similar to how AB3 checks for equality ofName. - Step 2: The future implementation of the additional check for
Person#isSamePerson()could beotherPerson.getTelehandle().equals(getTelehandle());
- Step 3: This would then throw a duplication error in
UniquePersonList#setPerson()whenever it receives a duplicatedTelehandlesimilar to when it receives a duplicatedName.
- Step 1: In the
C.3 Improve Error Messaging for ‘theme’ Command
Currently, our system’s error message for invalid input related to the ‘theme’ command does not effectively communicate the nature of the error. Users may receive an error message that implies a problem with the command format, even when the issue is with the parameter itself.
- Proposed Enhancement:
- To improve user understanding and minimise confusion, we plan to enhance the error message associated with the ‘theme’ command. Rather than attributing the error to the command format, we will explicitly communicate that the error is due to an invalid parameter and provide clear guidance on the accepted inputs.
- Implementation Details:
- Step 1: In the
ThemeCommand.java, we will include a newINVALID_PARAMETERmessage string. - Step 2: Afterwards, in the
ThemeCommandParser.java, we will change the parameters of the thrownParseExceptionto the newINVALID_PARAMETERmessage string instead of the current implementation ofMESSAGE_INVALID_COMMAND_FORMAT.
- Step 1: In the
- Possible Error Message:
Invalid Parameter! The error is not related to the command format but rather due to an invalid parameter. To set the theme of NUSCoursemates, please use one of the accepted options:
'dark' for dark mode
'light' for light mode
Example: theme dark
C.4 Improve error message for commands which take in an INDEX
Currently, when an unrealistically large positive integer is entered as the INDEX for commands such as delete and edit, the error message displayed suggests that there is a problem with the command format even if the command format is correct. The inaccurate error message is shown because INDEX is too big to be parsed, resulting in an integer overflow.
- Proposed Enhancement: We plan to conduct validation checks on the positive integer input by ensuring that it is within an acceptable range imposed by us. Moreover, we will enhance the error messages returned from these features by providing clear guidance on the accepted inputs in the error message.
- Implementation Details:
- Step 1: The user input is deconstructed into the various parts.
- Step 2: The length of
INDEX(a string) will be determined for commands which take in anINDEX. - Step 3: If the length of
INDEXexceeds the length of the size of the student list, the string will not be passed intoParserUtil#parseIndex()for parsing. An error message will be returned, stating that theINDEXentered is invalid. - Step 4: Otherwise,
INDEXwill be parsed and the process thereafter remains unchanged. - Possible Error Message (in Step 3):
Invalid Parameter! The INDEX you have entered is invalid. You must only enter a positive integer after the command word that is within the size of the student list.
C.5 Incorporate courses from Special Terms 1 and 2 into NUSCourseMates
Currently, NUSCoursemates recognises courses from Semesters 1 and 2 only. It does not recognise courses from Special Term (ST) semesters. Therefore, users are not able to enter these ST courses into NUSCoursemates as it will deem ST courses as invalid. In addition, new courses may be rolled out throughout the semester.
- Proposed Enhancement: We plan to include these ST courses in the list of valid courses. We also plan to update the list of valid courses in NUSCoursemates regularly.
- Implementation Details:
- We plan to update the list of valid courses throughout the semester by regularly and periodically fetching this list of courses, which includes ST courses, from the NUSMods API.
- The
CourseUtilclass would be need to be populated with new courses on a regular basis. To make this more extensible and remove the need for hardcoded values, we would need to configure the app to fetch data from the NUSModsAPI instead, which is out of the scope of this course.
C.6 Customising the sort functions
While there are various sort features implemented for users to sort NUSCoursemates, these sort features are fully pre-determined by us. Therefore, users may not be able to sort NUSCoursemates in a way they prefer. For example, for sort tags, students tagged as ‘Close Friend’ are arranged before students tagged as ‘Friend’ and ‘Emergency’. Users are currently not able to customise this feature by changing the order.
- Proposed Enhancement: We plan to allow users to customise the various sort functions to suit their preferences by introducing new parameters which increase the capabilities and versatility of these sort functions.
- Implementation Details (with reference to the
sort tagscommand):- Step 1: The user determines the priority of tags. For example, the
Close Friend,FriendandEmergencytags could have the priorities of 1, 2 and 3 respectively. - Step 2: The user enters the priorities of these tags in order, giving rise to the
sort tags 123command. - Step 3: The command is parsed, and a priority is attached to each tag.
- Step 4: The students in NUSCoursemates are arranged by their highest priority tags according to the tag priorities given by the user.
- Step 1: The user determines the priority of tags. For example, the
C.7 Updating Telehandle’s requirement
The current telehandle requirements do not align with the real requirements of the telehandle for Telegram.
- Proposed Enhancement: We aim to adhere to Telegram’s telehandle requirements, which include constraints such as not starting with a number or underscore, not ending with an underscore, and limiting the use of more than one underscore.
- Implementation Details:
- Make changes to the regex pattern in the
Telehandleclass.
- Make changes to the regex pattern in the
C.8 Improving error messages
Currently, the error messages returned for commands such as add and edit are not comprehensive enough. When users enter multiple invalid fields for these long commands, the error message returned suggests one incorrect field among the many multiple invalid fields that may be present.
- Proposed Enhancement: Instead of displaying an error message that shows the first error in the user input, we plan to combine all the errors found in the user input into one single error message. Afterwards, this error message will be displayed to the user.
- Implementation Details:
- Step 1: The user input is deconstructed into various fields.
- Step 2: The fields are parsed. If an error is thrown while parsing the field, the error message will be stored.
- Step 3: When there are multiple errors, the respective error messages will be appended into one long error message.
- Step 4: An exception is thrown, and this error message (consisting of multiple smaller errors) is displayed to the user.
C.9 Finding tags
The current feature set includes search capabilities with findstudent and findcourse,
however, the absence of a dedicated findtag command limits users’ ability to locate students
based on specific tags. This enhancement proposes the addition of the findtag command to provide
users with a more comprehensive search experience.
- Proposed Enhancement:
We plan to allow users to be able to
findtagso that they can easily find their list ofClose Friend,FriendorEmergency. - Implementation Details:
- Step 1: Update
AddressBookParserto recognise and route thefindtagcommand. - Step 2: Introduce
FindTagCommandParserfor extracting tag keywords from user input. - Step 3: Create
TagContainsKeywordsPredicateto check if a person’s tags match specified keywords. - Step 4: Implement
FindTagCommandto execute based on the constructed predicate. - Step 5: Display to user on the number of persons found with specified tags.
- Step 6: Update
MainWindowandTagListPanelto reflect UI changes.
- Step 1: Update
Appendix D: Effort
Overall, we felt that the difficulty level for NUSCoursemates was moderate. When creating NUSCoursemates, which evolved from AB-3, we meticulously considered the overall design, architecture, and testing aspects to ensure the development of meaningful features for our intended users, SoC students.
Justification for effort:
-
Changing existing commands - While some commands, such as
list, were adapted from AB-3, there were many cases where the code for these commands had to be rewritten or tweaked for NUSCoursemates. For example, thefindfeature was heavily modified and separated into newfindcourseandfindstudentcommands. -
Creating new classes - We created multiple new classes (such as
course,tagsandtelehandle) which are common and important attributes of our target users. -
Implementing new features - We implemented new features which deal with these new classes too. The
sortandedit c/add-are examples. Moreover, there are validation checks for each of the new attributes. - Huge improvement in UI - With JavaFX AND FXML, we are able to create the current NUSCoursemates UI which is made up of different components and gives users the option to switch between different themes.
- …and many more!
We faced numerous challenges in this project:
- Learning new technologies - Adjusting and familiarising ourselves to new technologies such as Git and GitHub were difficult for us. For example, we often made edits to the same piece of code which resulted in messy merge conflicts that took up valuable time to resolve.
- Time constraint - We were also faced with tight deadlines for the various milestones and submissions. This also meant that we had to learn these new technologies in order to implement new features fast.
- Immediately applying what we learnt - Juggling between the project and the concepts taught in the course was particularly difficult. For example, although heuristics for test cases were only taught towards the end of the course, we were already expected to apply them in the testing component of our project.
Achievements: We are definitely proud of our final product. We have picked up many invaluable soft skills (such as teamwork and collaboration) in a short amount of time, and expanded our technical proficiency in ways we had not anticipated at the project’s onset.
It has been a wonderful (but really tiring) journey for all of us!